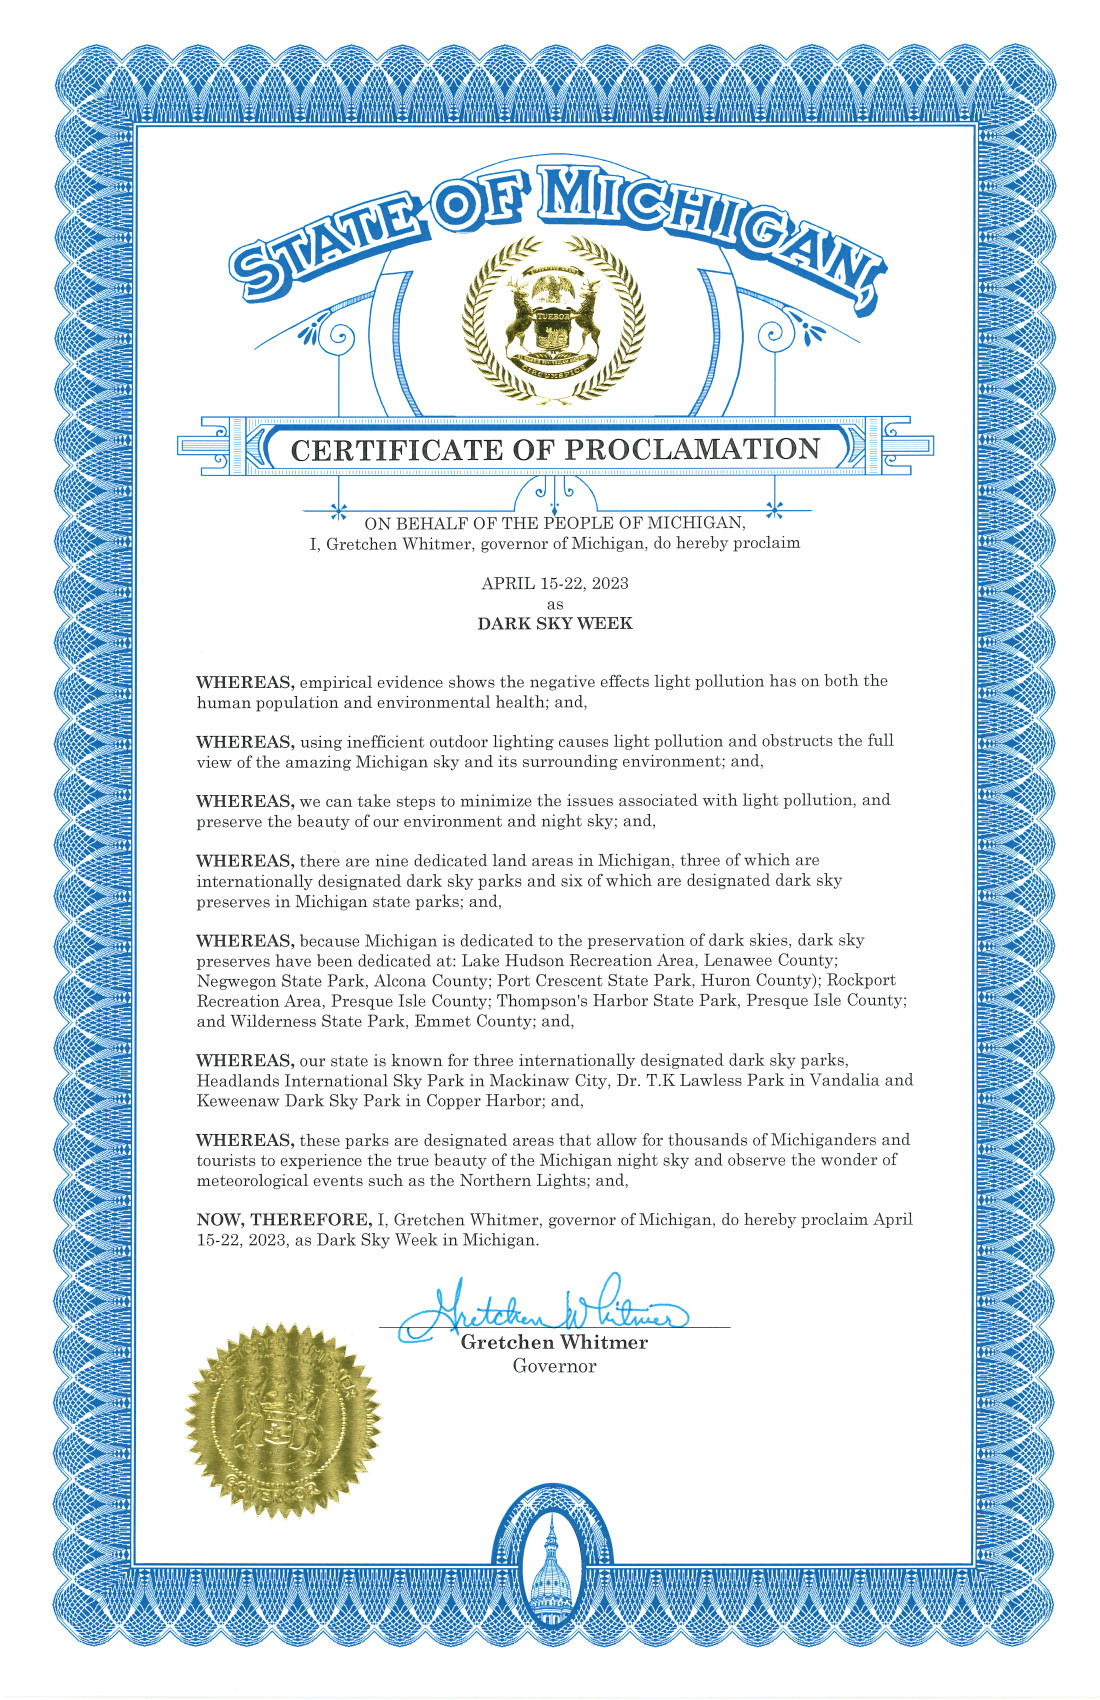
The Plants and Animals of the Keweenaw Mountain Lodge
written by Tom Oliver | April 15, 2023
Finally…after a long time of planning and prep work, I have gotten the Lodge’s iNaturalist project up and running.
Header from the Keweenaw Mountain Lodge’s iNaturalist project page, entitled “Plants and Animals of the Keweenaw Mountain Lodge.”
iNaturalist (a joint initiative by the California Academy of Sciences and the National Geographic Society) is a one of the world’s most popular nature apps. It helps people identify plants and animals and connects them with a social network community of over a million scientists and naturalists. By recording and sharing observations of living things, participants also create research quality data for scientists who are working to better understand and protect nature.
Participants, once they have collected enough “Research Grade” observations, are able to create projects within the network. Projects tend to focus on aspects of the living world in which the participants who create them are interested.
For the Keweenaw Mountain Lodge’s project (entitled Plants and Animals of the Keweenaw Mountain Lodge), I first needed to create a defined boundary which closely follows the Lodge’s property boundary. A georeferenced “KML” file (that’s the name of the file-type…not, in this case, the initials of the Lodge) was created using Google Earth Pro. That file was then imported into iNaturalist. Once the “place” was created, I was then able to define the parameters of the project – basically, all living things documented by iNaturalist participants which fall within the boundaries of the property.
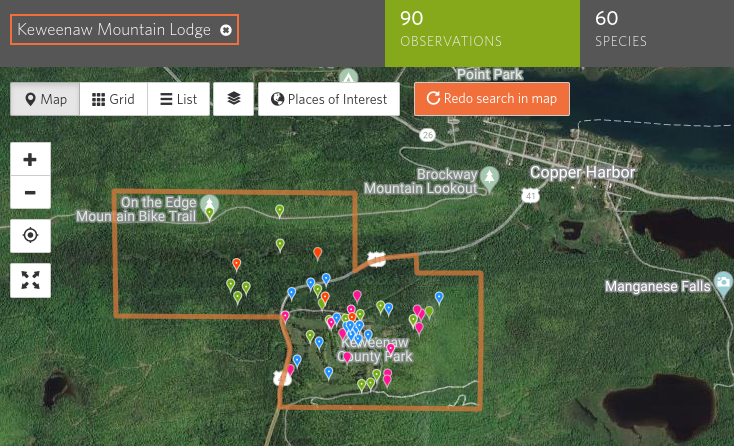
This is a map of the Keweenaw Muntain Lodge’s property in iNaturalist. Within the property boundaries, you can see the color coded pins for the 90 observations of 60 different species identified at the Lodge, so far.
1) Many of our guests and employees value their encounters with nature as an important part of their experience at the Lodge. There is always people curious about what they have seen and what they might encounter. This platform will give us all an additional means of sharing that information with each other.
2) One of the Keweenaw Mountain Lodge’s values is to “be fearless and persistent in learning on a daily basis.” Using iNaturalist for recording and identifying species on the Lodge’s property is one more way in which people can learn about the plants, animals, and ecology of the the Lodge and or the region.
3) The Keweenaw Mountain Lodge is pursuing certification, through Audubon International’s “Audubon Cooperative Sanctuary Program.” One of the core tenets of that program is that participating organizations must maintain a list of species found on the property and incorporate wildlife management initiatives. Having a project (such as this project in iNaturalist) in which we have a broader collection of people contributing enhances the Lodge’s ability to know what plants and animals we have on the property.
5) The Keweenaw Mountain Lodge supports efforts in academic research and views the encouragement of people participating in citizen science projects (e.g., iNaturalist) provides data from which researchers may benefit.
6) Our iNaturalist project will serve as the data collection site for future activities (e.g., BioBlitzes) which require the collection of data about plants and animals.
7) We will be able to create checklists from the data stored in iNaturalist, which guests and employees will be able to use if they decide to search the property for unique species they have never seen.
Top of the Keweenaw Tidbits: Why red light is better for night-time activities
written by Tom Oliver | April 15, 2023
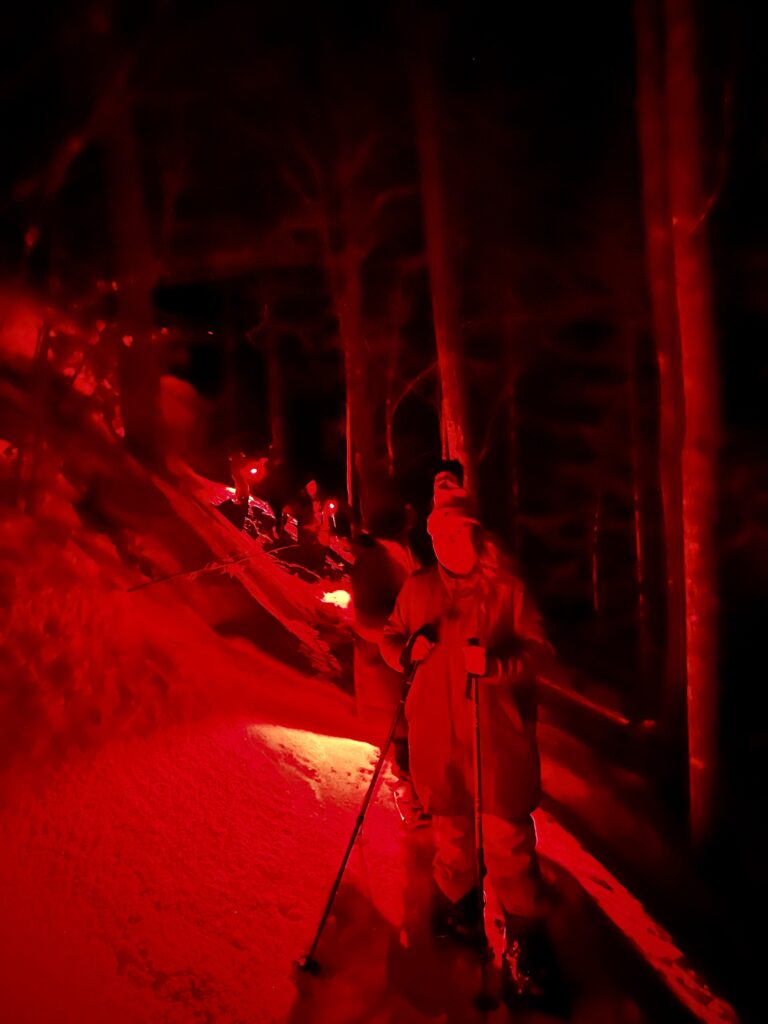
A question we repeatedly answer when venturing out for night-time activities (e.g., Night Photography Workshops and Moonlit Snowshoe Hikes) is “Why do you recommend flashlights or headlamps that emit red-colored light?”
Flashlights that emit red light work best for night-time activities.
The basic answer to that question is that red-light does not ruin people’s night vision as much as other colors of light, especially white light. So, to maximize a person’s nighttime outdoor experience we suggest using a flashlight that emits red light.
For some people that is a suitable answer. However, I tend to be one of those people who, like a 3-year old, keeps asking “Why?” until I feel I have a good understanding of the science behind a phenomenon. So, to accommodate that persistent 3-year old in all of us, the remainder of this blogpost will delve into the science behind the reduced impact of red-colored light on human night vision.
Natural human exposure to light:
Here, at the “Top of the Keweenaw,” the amount of daylight (which, for simplicity, I will define as the time beginning with morning civil twilight and and ending with evening civil twilight) fluctuates between 9 hours 39 minutes (on the winter solstice) and 17 hours 18 minutes (on the summer solstice. If we sleep, on average, 8-hours per day, that means (prior to the invention of artificial light) humans, living at the same latitude as the region we now call the Keweenaw, needed to be able to see in darkness for up to about 6 hours 20 minutes (for humans living in higher latitudes there were longer periods of darkness).
Human eye anatomy:
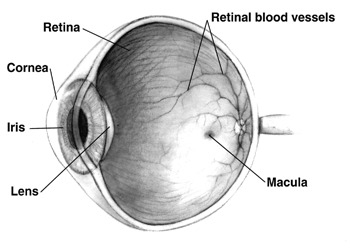
As a flashback to high school biology, the human eye’s form is to serve the function of focusing light on the innermost tissue of the eye (retina), which contains light-sensitive cells. To trigger these light sensitive cells, light must pass through a lens suspended within an opening (pupil), which is capable of changing in diameter depending on the brightness of the environment. When the environment has an increased availability of light, the pupil is narrowed. In low light conditions, the pupil is widened to allow as much light into the eye as possible.
The most common thing that people think of regarding our ability to see at night is that the pupil widens to allow more light in and then constricts when the eye is exposed to bright light. Then, when the light levels decrease again, the pupil widens in response. This response in the pupil is actually relatively quick, so many people think that bright white light has a minimal effect on night vision. However, our ability to see in darkened conditions is a bit more complex.
A simple cross section of the human eye. (Image is in the public domain and was obtained from the National Institute of Health)
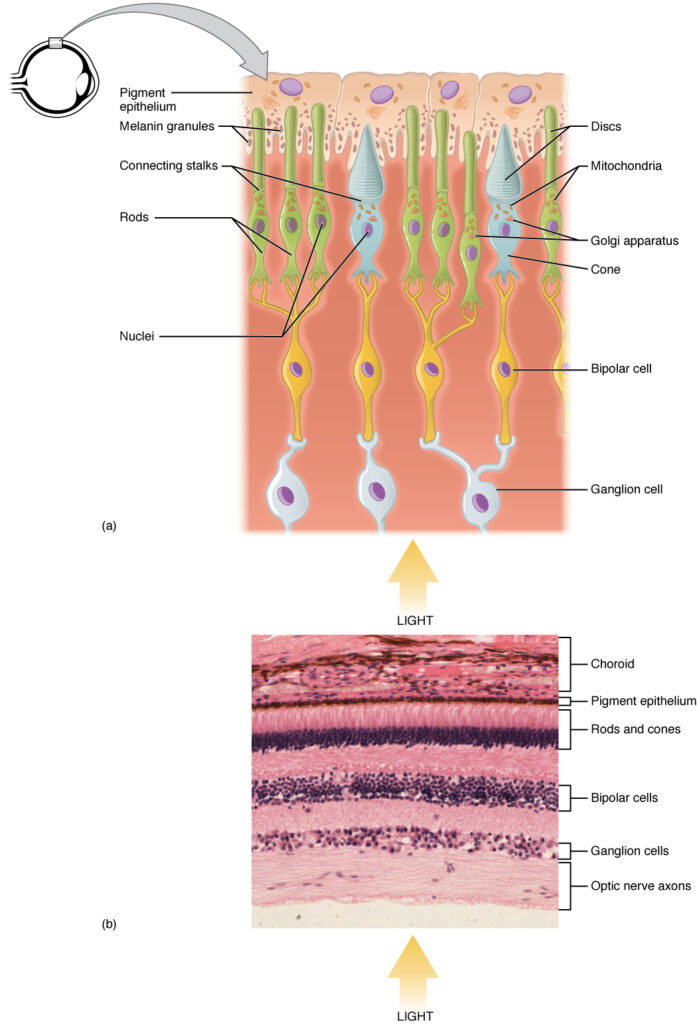
Retina composition (rods vs. cones):
Since humans tend to live a diurnal (daytime) life, we need to be able to see in both light and dark environments. For this to occur, our eyes have two types of light sensitive cells:
Cones, which are primarily used for detailed color vision, and
Rods, which function in low-light levels and provide less detailed gray-scale vision.
Early humans needed threat detection at night; so, while rods function poorly for sensing detail, they work best at detecting motion. Since threats tend to sneak up from the side or behind, rods are most concentrated within the retina along its periphery, whereas cones are most concentrated near the central part of our vision. Ultimately, this arrangement of retinal cells allows humans to more effectively detect motion at the edge of their view at night, while being able to see detailed colored objects straight ahead during times when there is more available light. If you have ever noticed that as dusk progresses, it is easier to locate faint stars by not looking straight at them, this is a technique which uses peripheral vision called “averted vision.”
The way that light sensitive cells work is that they have, like other nerve cells in the body, chemical transmitters which are triggered by a stimulus (light). For rods, that chemical is a pigment protein called rhodopsin (cone cells have different pigment proteins that carry out a similar function). Basically, as light levels drop, rhodopsin begins to become active in the rods and night vision is able to set in.
Photoreactivity of rhodopsin:
As mentioned earlier, people often think that the most important factor for improved night vision is how large the pupil opening becomes as a response to low light. While that physical response is important, pupil diameter actually maximizes very quickly (within a few minutes) to dark exposure; where as night vision can take a very long time to maximize. The more important factor in night vision is the pigment rhodopsin. The way that rhodopsin works is that photons of light strike the pigment, causing it to change shape. That shape-change in the protein then triggers a sequence of reactions, ultimately resulting in an electrical signal which travels along the optic nerve, which is interpreted by the brain. Rhodopsin is so sensitive to light that it can react to a single photon of light (which makes rod cells about 100 times more sensitive to light than cone cells). Once rhodopsin is activated by light, it takes between 20 and 40 minutes for it to return to its original shape, which will then allow it to react to light again. Therefore, even a short burst of bright light (which contains a high concentration of photons) will cause rods to stop working and they will not return to their full capability until the rhodopsin can return to its reactive shape.
It has been discovered that rhodopsin is not triggered by deep red-colored light. However, It is rare to find light that contains a pure single color. Since red-colored light we see often has some blue-light and green-light, it can trigger the rhodopsin in the rod cells. This means that a very bright red-colored light is capable of triggering some of the rhodopsin in rod in red cells and consequently limiting night vision. That being said, a dim red-colored light still remains better for maximizing after-dark vision when compared to lights of other color.
Bring a Red Flashlight to After Dark Events
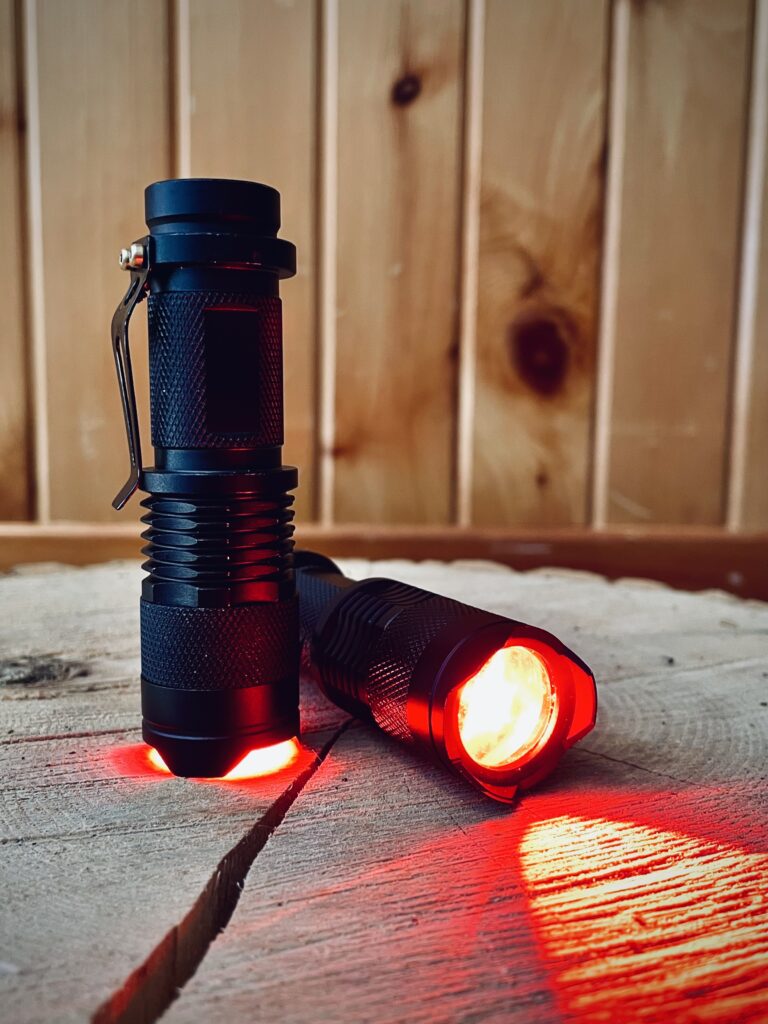
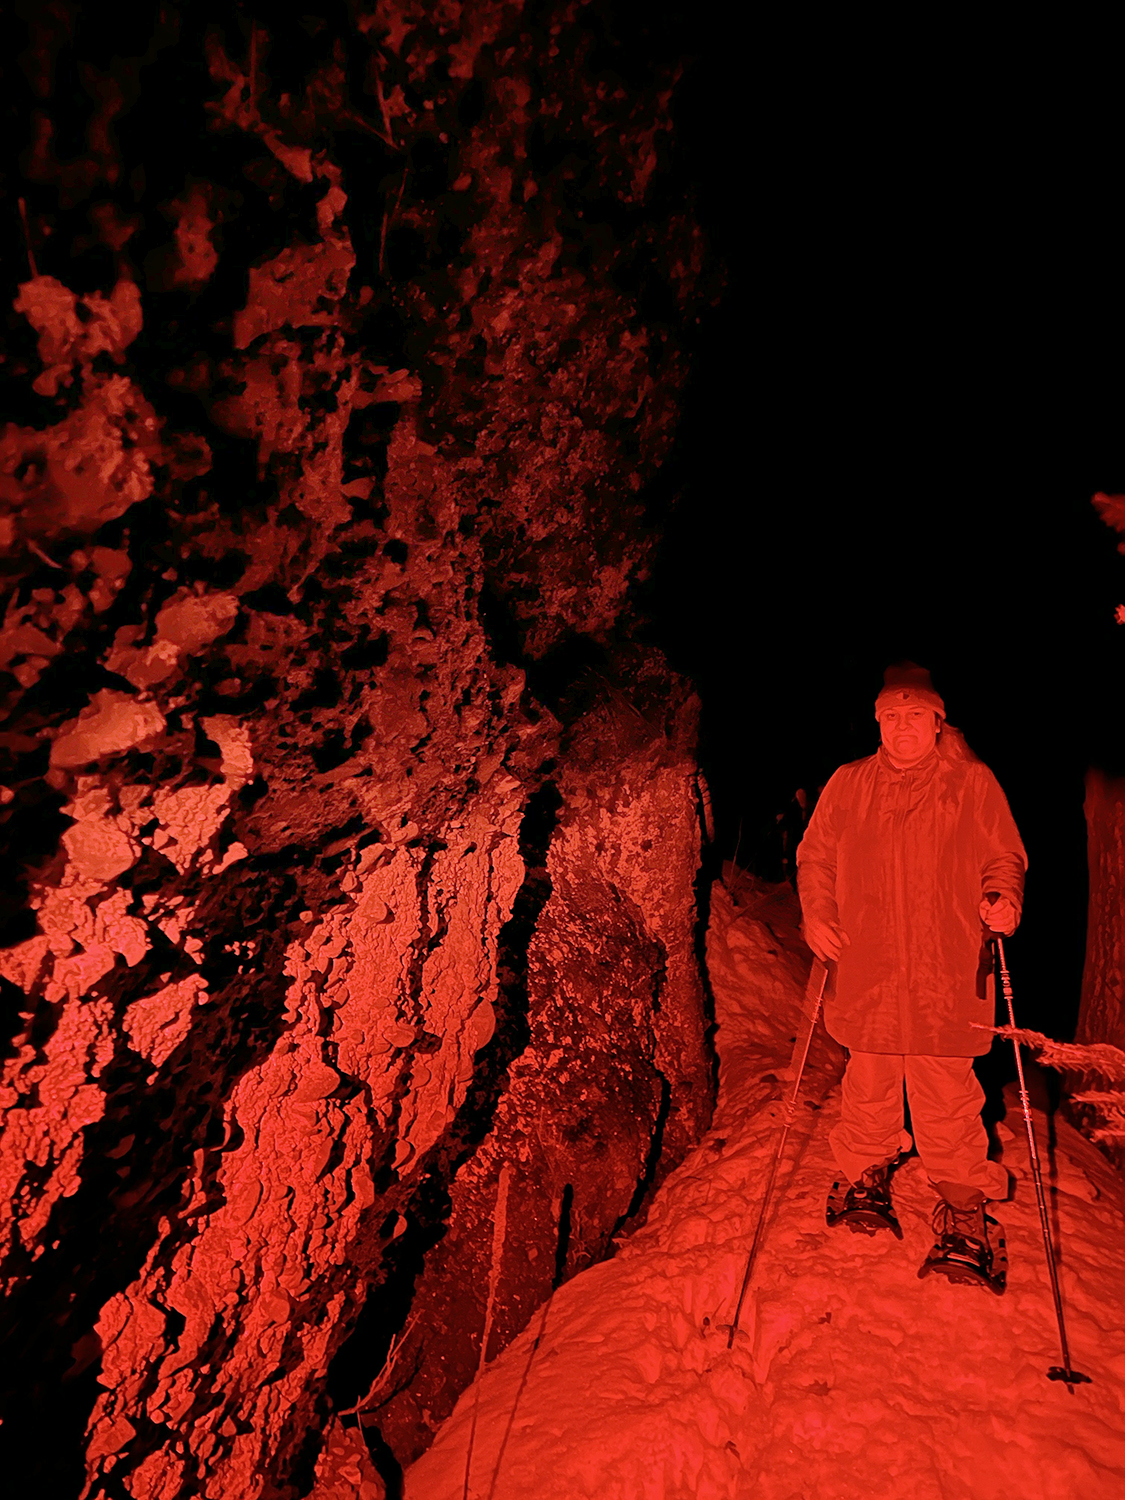
Here at the Keweenaw Mountain Lodge, we strongly encourage people participating in after dark events to use flashlights or headlamps which emit red-colored lights. (Please note: While these lights are red-colored, we have specifically selected “red” flashlights that are brighter than most red LED lights. We decided to provide these brighter red LEDs so guests could benefit from improved night vision while still having a bright enough light to better navigate uneven, forested terrain.)
For the reasons mentioned above, flashlights, headlamps, and cell phone lights which emit white light are discouraged. To aid in that request, the Outdoor Activity Center has flashlights which emit red-colored light available for guests to borrow.
The single mode, red LED flashlights used at the Keweenaw Mountain Lodge are powerful enough to provide sufficient light to enable night adventurers to see obstacles and uneven terrain but, due to the red light spectrum they emit, they do not impact human night vision as much as standard white-light flashlights.
If you do not have access to flashlight or headlamp which emits red-colored light, it is also possible to convert a standard flashlight to red by:
using red cellophane with a rubber band (or a red-colored zip-top resealable bag) to cover the lens of the flashlight.
“paint” the plastic lens of an older flashlight with red nail polish or a red magic marker.
Flashlight Etiquette:
Have you ever been in a dark room for a long enough period of time that your eyes have become accustomed to the low light and then someone unexpectedly turns on the lights? It can be so bright at that initial moment it can feel painful. Please consider that reaction to bright light when participating in after dark events with the Keweenaw Mountain Lodge. Sudden bright lights can impact the experience of, not just yourself but, others around you.
Be thoughtful in the sources of light you are producing and follow these suggestions to minimize your light impacts.
Use a light that emits red-colored light.
Never shine a flashlight/headlamp/cell phone light (including a “red” flashlight) in the direction of another person.
If you are wearing a headlamp, remember that if you turn your head toward someone else, you are shining your light directly at them.
If possible, shield your cell phone screen, camera LCD, or other similar screens from others when outside in the dark.
When using your light (even if it is red) around others try to reduce the amount of light being broadcast by covering the lens with your hand and only allowing the amount of light you need to pass through gaps between your fingers.
Use a small amount of dark non-residue tape (e.g., gaffer tape or black painter tape) to cover the recording light on your camera).
Recognize that others might not realize the impact they are having on your experience. When others are using lights, be tolerant if they accidentally disturb you with their light and remain polite if it happens repeatedly.
Moonlit Lodge – A Beauty [ Photography ]
written by Chris Guibert | April 15, 2023
I had preconceived the image Moon Over the Lodge the morning of the day I took the image on Saturday, March 19, 2022. I was talking with a fellow Lodge team member and they were telling me about where the moon rose the night before when it was full on March 18, 2022. I visualized where the moon would be over the Lodge and thought it would be a great photograph. I was going to be guiding a moonlit snowshoe hike that evening and the weather report was stating clear skies. It was all aligning for a good chance at a great shot of the moon over the Lodge.
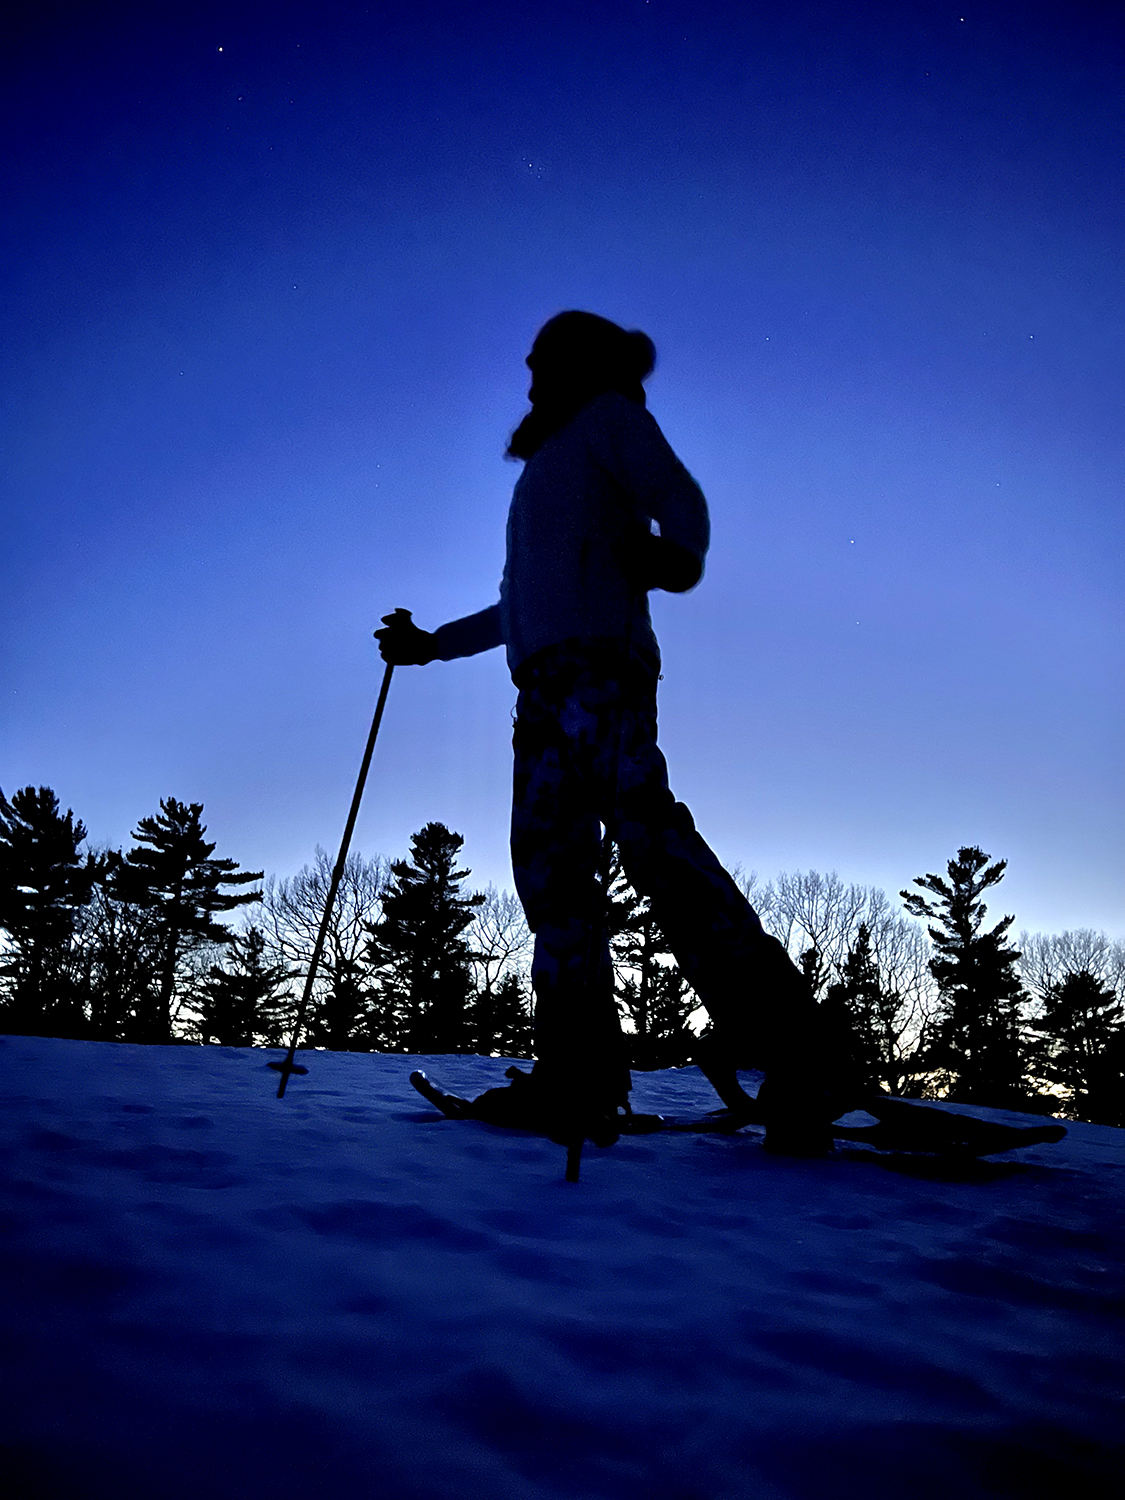
The snowshoe hike had its challenges because the moon was not going to rise over the hill until about 10:00 pm, while the snowshoe hike started at 8:45 pm. Our group used red light flashlights to navigate the slippery trail in darkness. The reason the red flashlights are recommended when participating in nighttime activities is because red light does not impair night vision as much as other colors of light; so they can be used for short periods of time when needed and participants can then resume the activity without artificial light with minimal impact to their overall vision. The group took its time working its way around the 1.5 mile loop. It was a clear, warm night where the stars shined bright.
The hike finished just as the moon began to rise over the Lodge. I ran to my car and grabbed my professional photography gear. I shoot with a Canon 5D Mark IV and I only use Canon “L” lenses and chose the 24-70mm (f2.8) zoom lens. I noticed a large unexpected cloud formation blowing over the Lodge so I rapidly climbed the snow banks and attached my camera to the tripod. All pro photographers use a tripod to capture long night exposures. I actually leave my tripod base-plate on my camera all the time so I can quickly attach my camera to the tripod if need be.
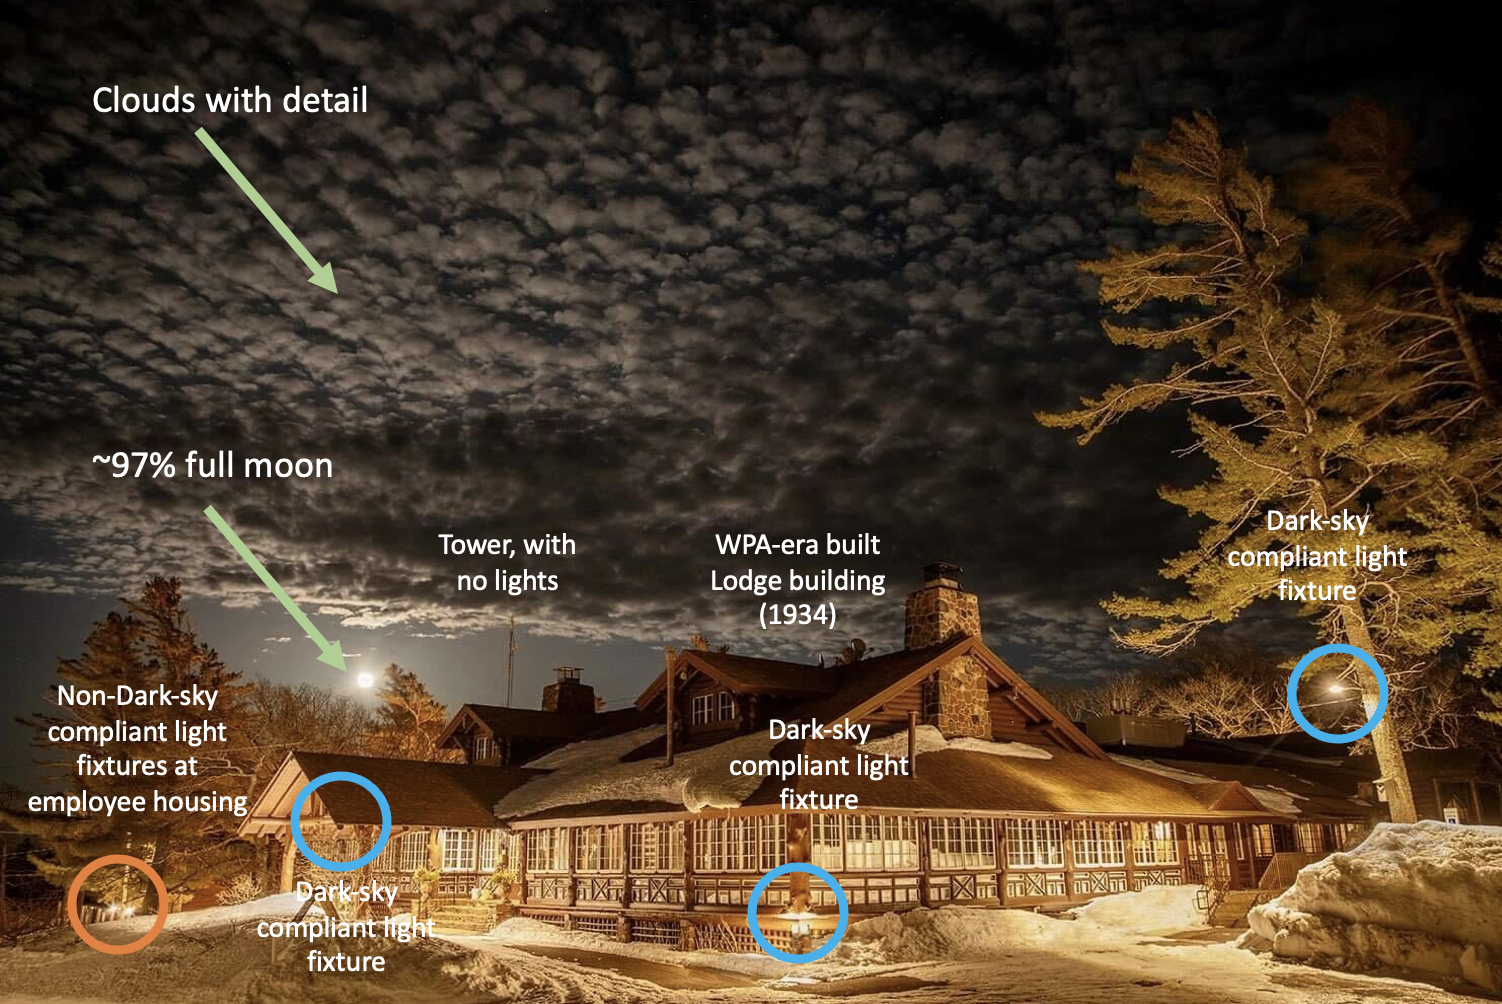
One of the issues I was taking into account was the fact that the Clubhouse is usually very dark, in the last year we have changed all of the outside lighting around the Lodge to be dark sky compliant. The Keweenaw Mountain Lodge has been working with the International Dark Sky Association to establish the Keweenaw Dark Sky Wilderness. I knew the Lodge would be “dark” but I had a few tricks up my sleeve to make the Lodge appear well “lit up.” The first was that I was going to take a long exposure that would let what little light was available brighten the whole scene. The second was that the snow on the ground would reflect this light making the Lodge look even more brilliant and “uplight” the big pine. The final trick was the moon itself, I wasn’t sure how much it would brighten the scene but I was curious to find out.
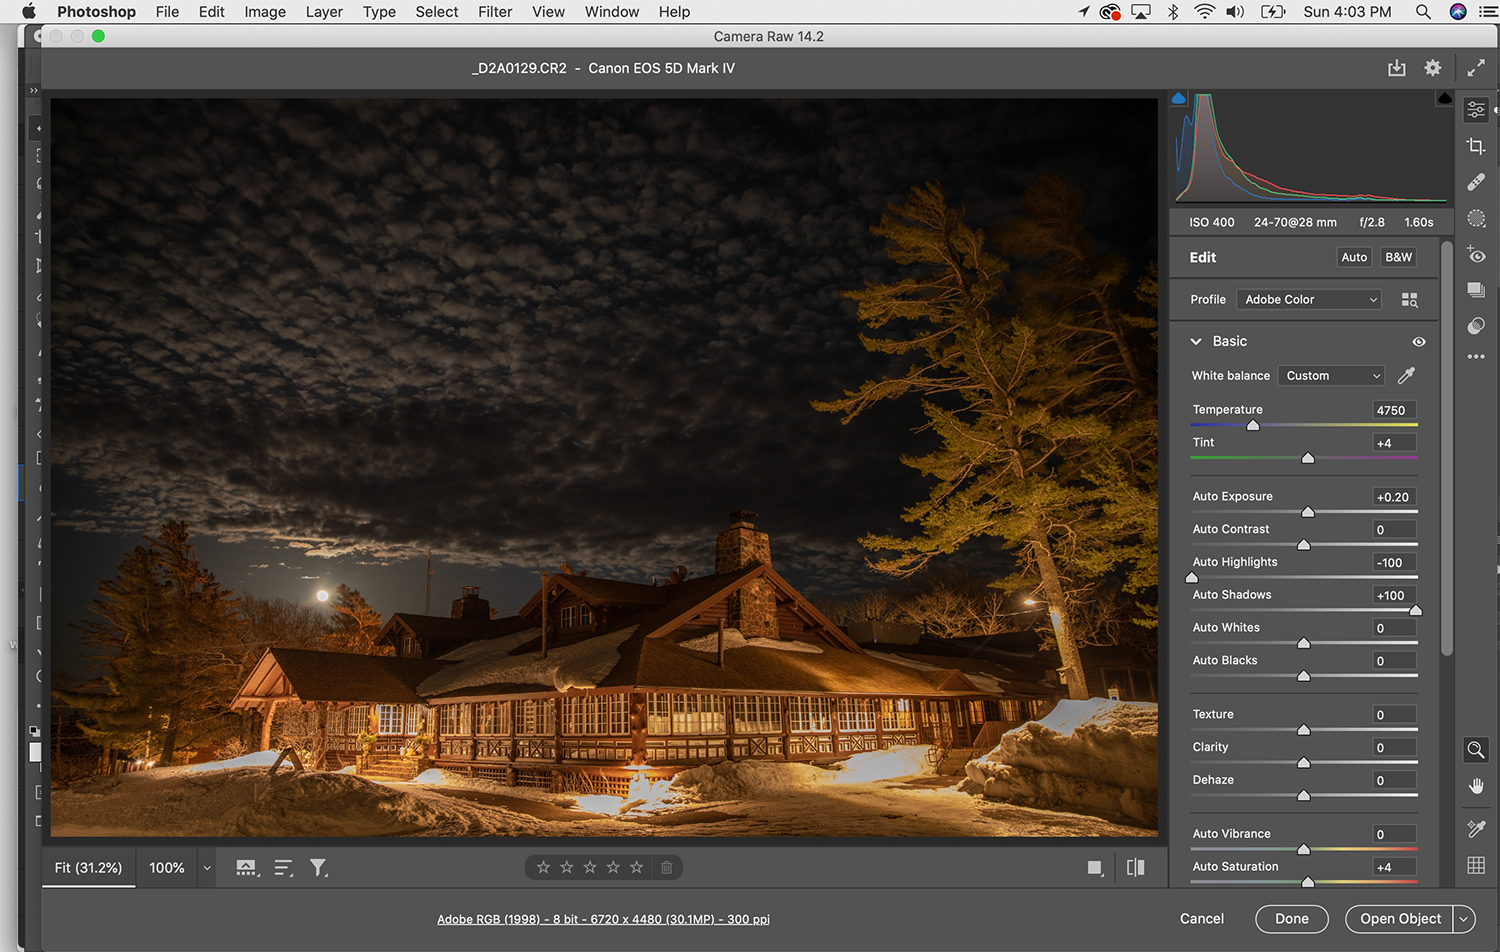
I was watching the clouds quickly moving in and was afraid they would cover the moon soon. I immediately started shooting some images. I use a 2 second timer when shooting on a tripod which gives the camera enough time to stop shaking after I push the button. I chose an ISO of 400 thinking this would give me enough light to get a faster shutter speed and still provide a “non-grainy” image. The first image’s exposure was 20 seconds at f8. I then shot another at 13 seconds at f8. I was a little concerned with these long-of-exposures that the clouds would show some movement and not be sharp. I then opened the aperture up 2.8 which gave me a fast 1.6 second exposure. This seemed to stop the cloud blur. I then took about 5 more shots with different settings.
For me a big part of the process is done in the raw converter of Photoshop. I shoot all my images in the RAW format, which gives me the most leeway in getting details out of the highlights and shadows.
Every RAW conversion is different – for me this is a “visual process” and lets my style as a photographer shine through. For this image I opened up the shadows and turned down the highlights. I shifted the color temperature slightly and added just a few points of saturation. When comparing the photos before and after conversion, you can notice how much brighter the shadows of the clouds are in the latter image. I also slightly increased the exposure.
Image after Raw Conversion:
After the RAW conversion the file opens in Photoshop, I added three layers.
A saturation layer where I decreased just the yellow
A selective color layer where I shifted the color of the yellow
A curves layer where I added contrast.
The final step was adding some texture to the snow banks under the lights where the highlights were blown out (meaning that the highlights were so bright that details were difficult to see). I did this by cloning parts of the other snow bank with the clone tool. The final image is a dynamic moonlit shot of the Clubhouse. The long exposure let the Lodge seem brighter than it really is and the moonlit clouds captured a dynamic, fleeting moment that is now forever documented.
Below shows the light fixture changes that have been made around the lodge building to be dark-sky compliant.
Snowshoe Trail Grooming and Tracking Adventures (A Wolf?)
written by Tom Oliver | April 15, 2023
An important aspect of our winter activities at the Keweenaw Mountain Lodge (KML) is that we need to regularly check trail conditions, reset the trails after snowstorms, and sometimes repair trail sections which get damaged from use or changing weather conditions.
On Friday (March 18, 2022), I ventured out on the section of the Snowshoe Trail, which I knew was going to be used for our monthly “Moonlit Snowshoe Hikes” scheduled for the following night. With the recent warming trend we had seen in the region, I was concerned about 1) small avalanches possibly burying one particular section of the trail which passes below a short but picturesque “cliff” and 2) the overall stability of the snow due to the daily cycle of melt and freeze we had seen during the previous week. Inspecting the trail a day in advance would be much better than dealing with unexpected challenges while guiding a group of guests (potentially up to 20), after dark and in the cold.
Sometimes, though, doing regular tasks at KML provides some unique and unexpected experiences. In this case, as I rounded the snow-buried green for Hole #2 on our golf course, I noticed some animal tracks that caught my attention. Seeing animal tracks in the snow is not an uncommon occurrence and it provides me with a general understanding of the animals that actively use the KML grounds. I commonly see the tracks of squirrels, turkeys, snowshoe hares, mice, coyotes, and foxes while I am snowshoeing. On one occasion, I also encountered a set of bobcat tracks that crossed the trail.
The tracks I saw on Friday, though, were especially interesting to me. The prints were egg-shaped, with impressions from claws present, meaning that they were the tracks of a canine. They were large prints with, what seemed like, a large stride. My initial thought was that the animal making the tracks might be a wolf. However, animal tracks in snow can often appear to be larger than what they actually are, especially if the snow has been melting and refreezing.
For me to make the claim that a wolf (Canislupus) had passed over the golf course, I needed to eliminate the other possibilities – coyote (Canis latrans) and domestic dog (Canis familiaris) – first. So, I tried to find clear prints that were not deep in the snow, not distorted from any thawing, and easily photographable. It was the final requirement which proved, at first, to be unobtainable. I found tracks on the surface, where the hardened snow was able to support the animal, and left impressions about ⅛-inch to ¼-inch deep. However, given the mid-day light conditions, I could not get any of the pictures of the prints to look like anything other than snow with some texture. Hoping to find some better prints, I followed the animal’s path back to where it had crossed Highway 41 (adjacent to the west border of the KML property). I did not find any suitable prints
At this point, I decided that I likely wouldn’t find any prints that would suit my needs and that I still needed to complete my primary task, inspecting the snowshoe trail. So, I continued on with my trail inspection, accepting that I wouldn’t claim to have found wolf tracks on the property.
When I completed my trail inspection, the tracks remained on my mind. The particular thoughts that remained for me were 1) I might be able to find a suitable print to measure if the animal happened to walk through areas with more shallow snow, 2) if I followed the track, I might come upon other evidence (e.g., scat or a kill site) which could give me more information on the animal’s identity, and 3) the track appeared quite fresh to me and I was convinced that the animal had passed through sometime during the previous 12-14 hours…which meant that it could be bedded down somewhere among the trees and I might even be able to get a picture of the animal itself – if I was stealthy enough. So, I backtracked to Hole #2 on the golf course and picked up the animal’s trail on the opposite side of the green where I had initially seen it.
Because I thought it would be interesting to see a map of where the animal traveled on the property, I turned on a GPS app on my iPhone to record the path I was following. Then I began to slowly follow the tracks in the snow, searching for good prints or other sign the animal may have left, while scanning the land in front of me for any movement or unexpected spots in the snow which might be an animal lying down.
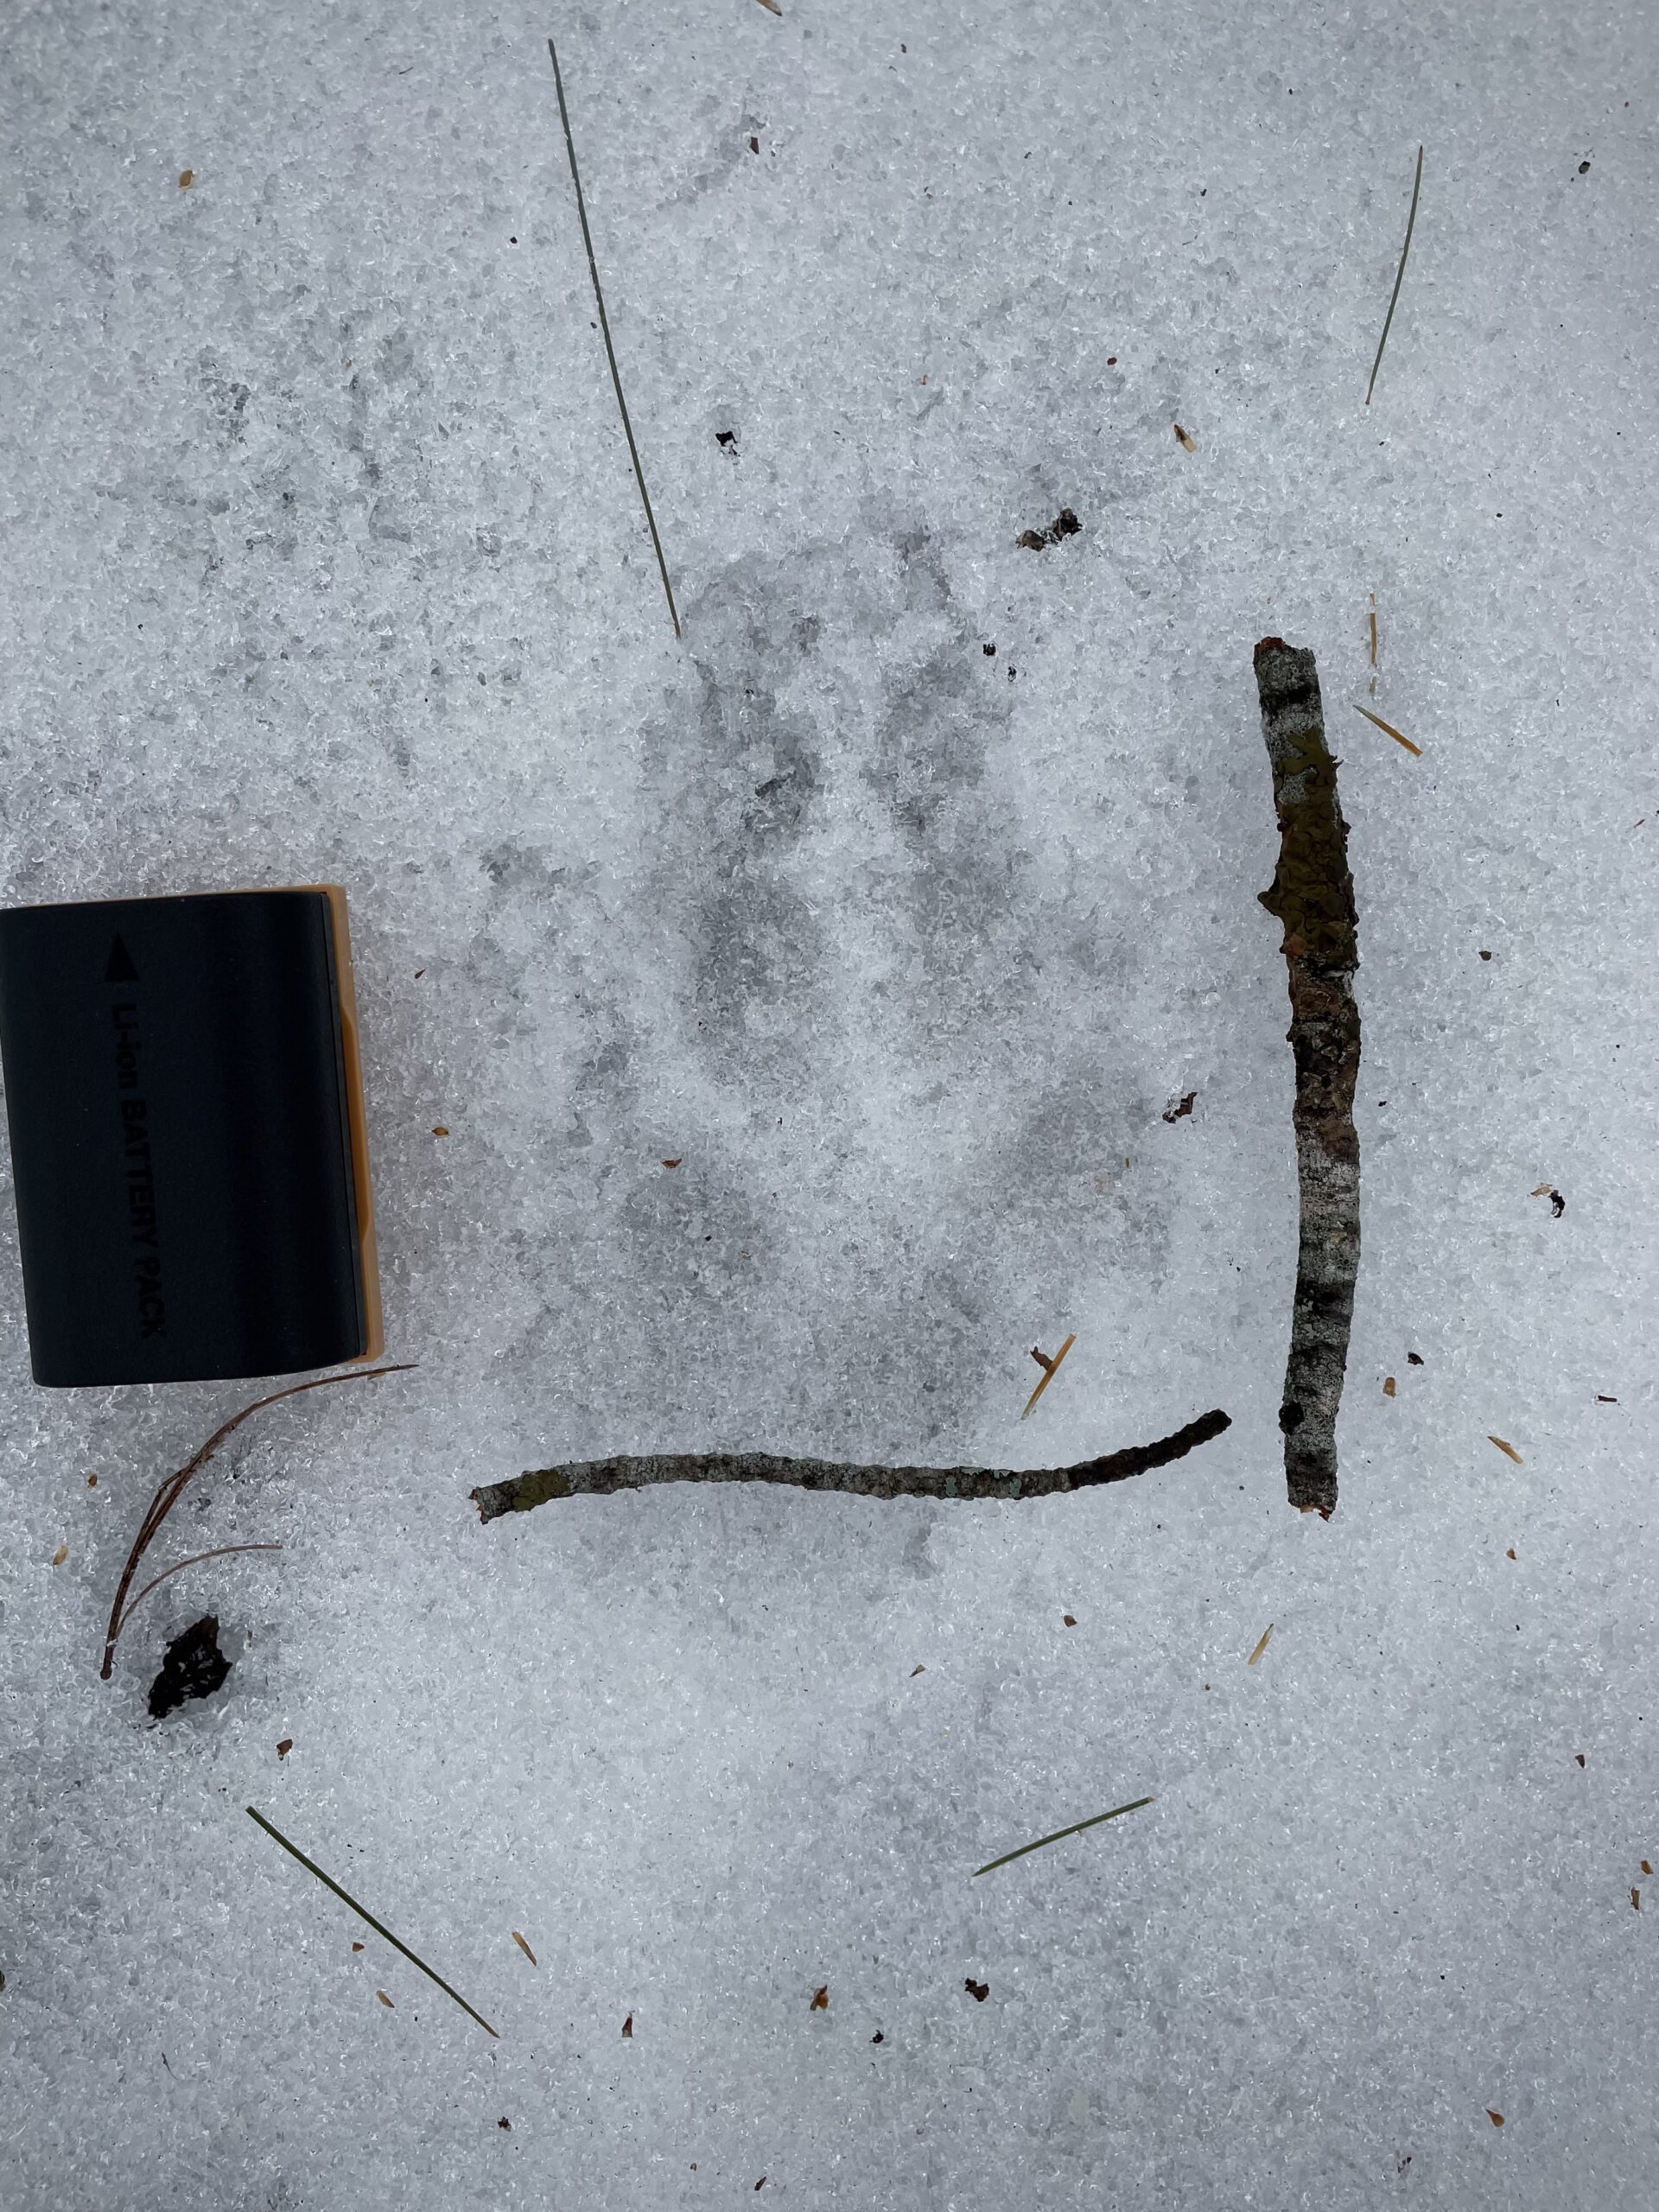
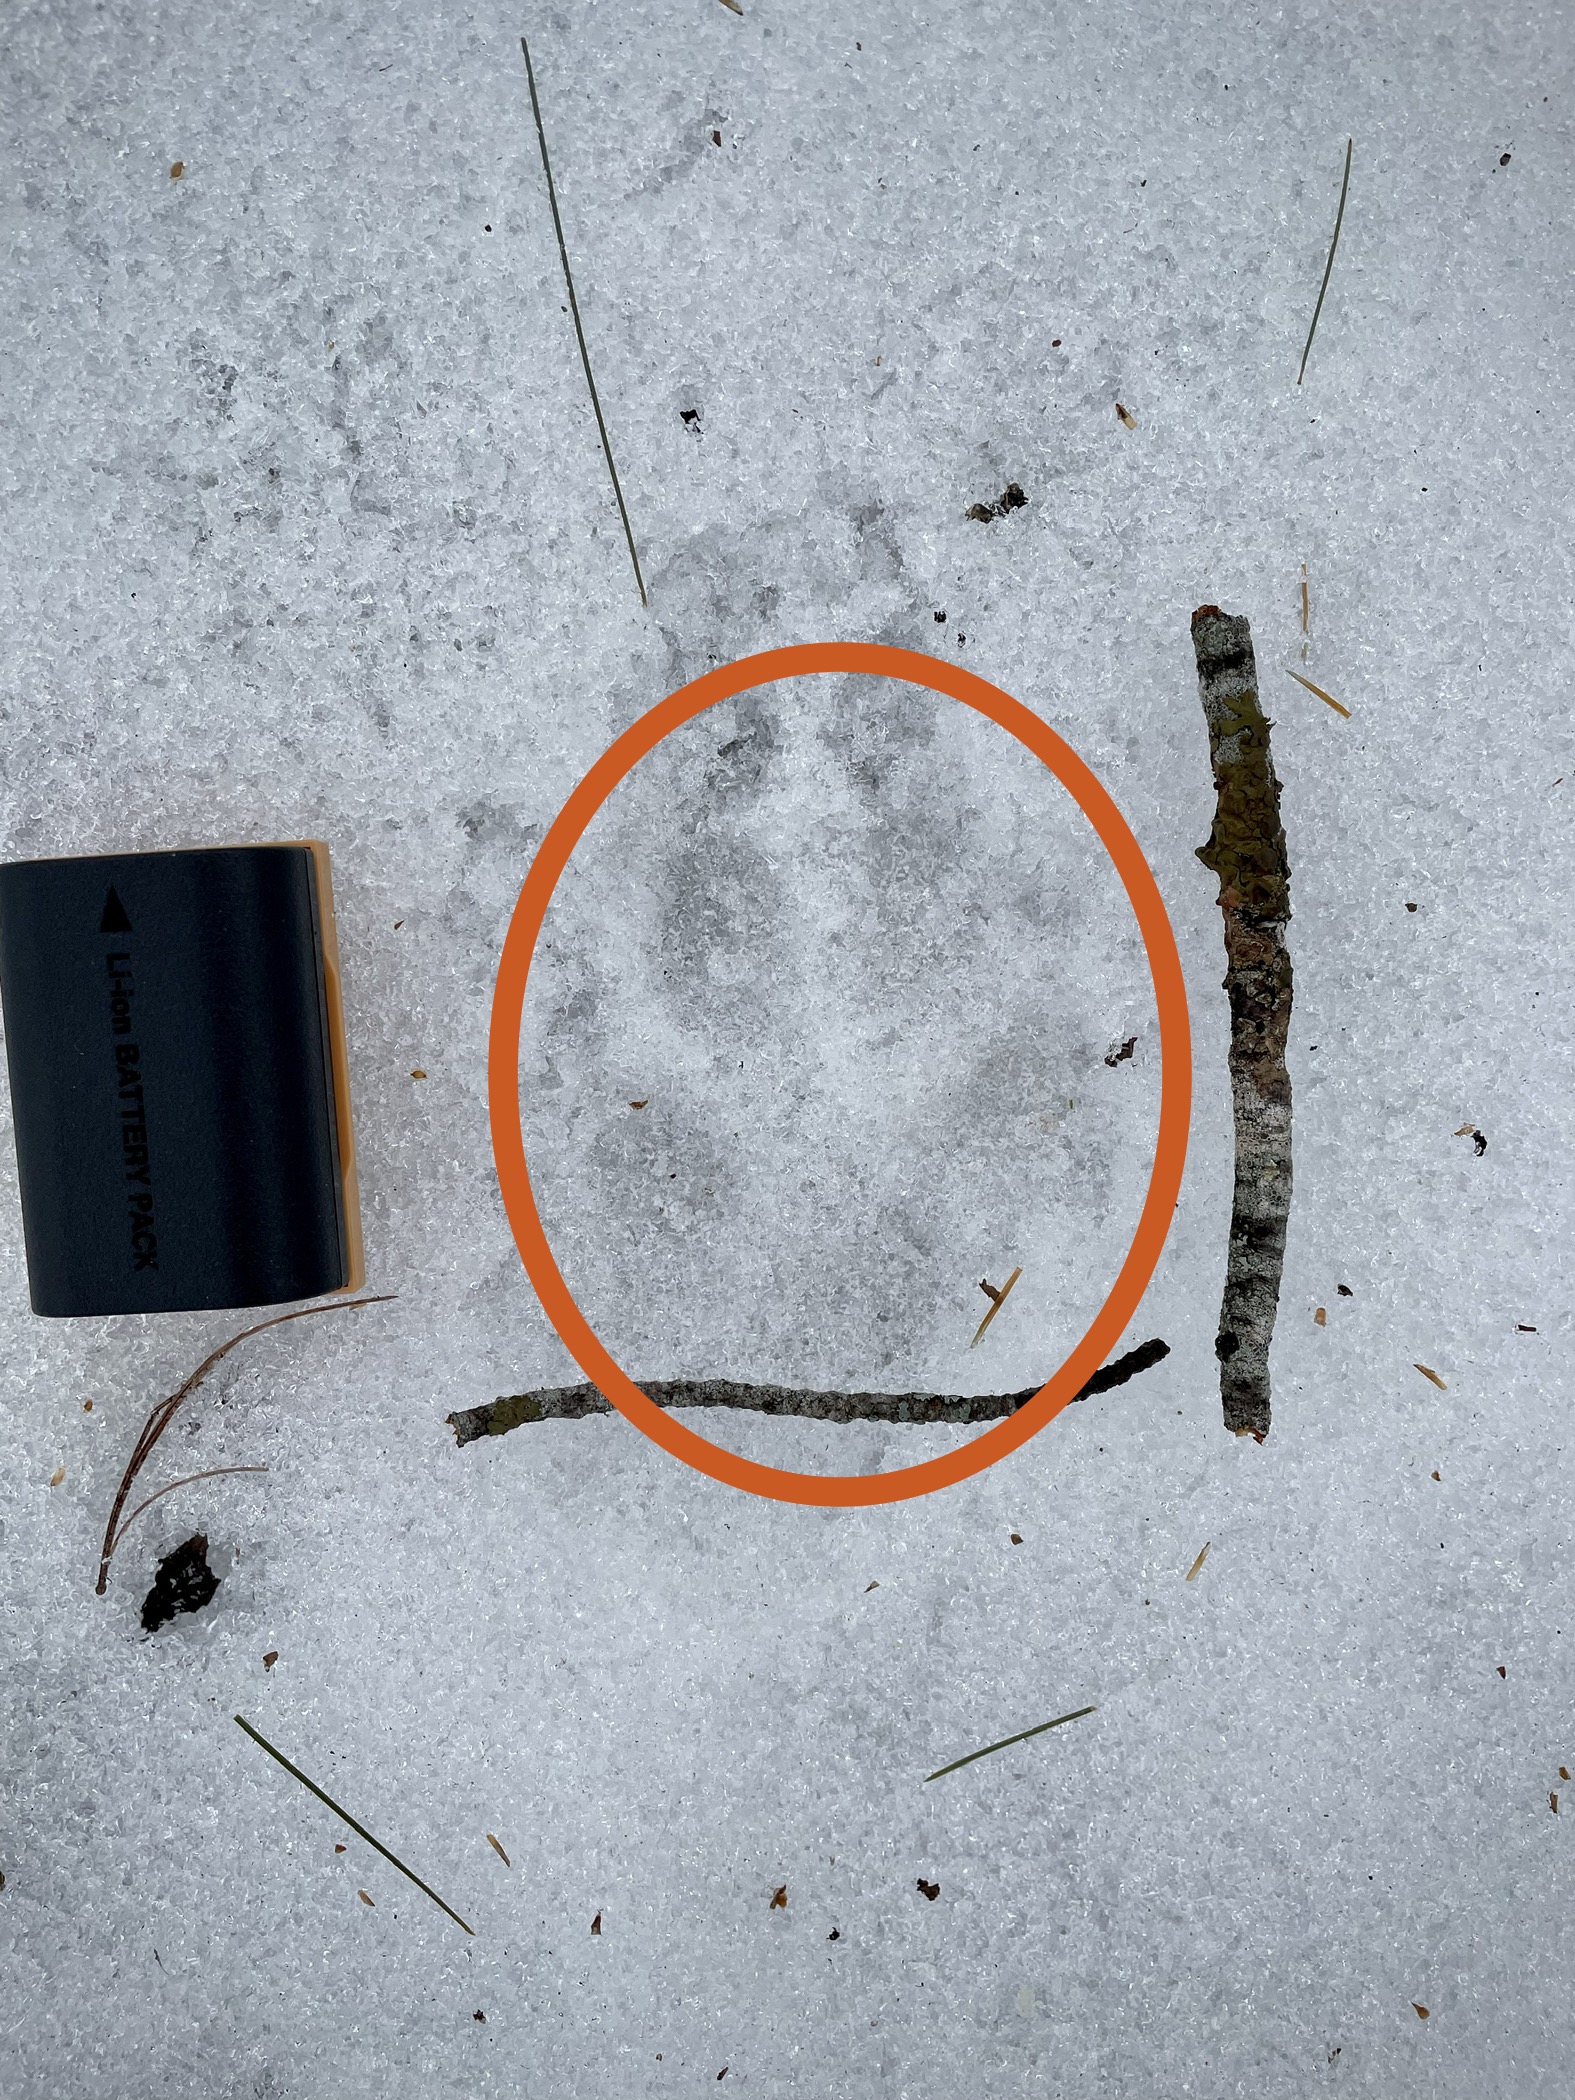
Within 30 feet, I found a print that was excellent for both measuring and photographing. It was at a location near the base of an older white pine tree where the snow had become shallow enough to not cause the print to 1) be obscured by loose snow falling into the print or so hardened that a print was not well formed. Additionally, the print did not sink into the snow too much to cause additional splaying of the individual toes, which could make the print larger than typical. All I had to do was measure it; however, I don’t typically have a tape measure in my possession when I go snowshoeing. I do, though, almost always have camera batteries, which I could use as a size reference in the pictures I took. I measured out two sticks close to the length and width of the print, placed them and the camera battery near the print and took a picture of it all. Even though this still did not immediately tell me the print measurements, after returning to the lodge, I measured the camera battery length and calculated how many battery lengths would meet the lengths of each of the sticks I had placed in the scene. While still imprecise, I was able to determine that the print was just shy of 5 inches and its width was a little bit more than 3 inches.
Animal print with camera battery and relatively straight sticks placed in frame references for measuring at a later time.
Animal print with camera battery and relatively straight sticks placed in frame references for measuring at a later time. Circle indicates the general space of the track measured.
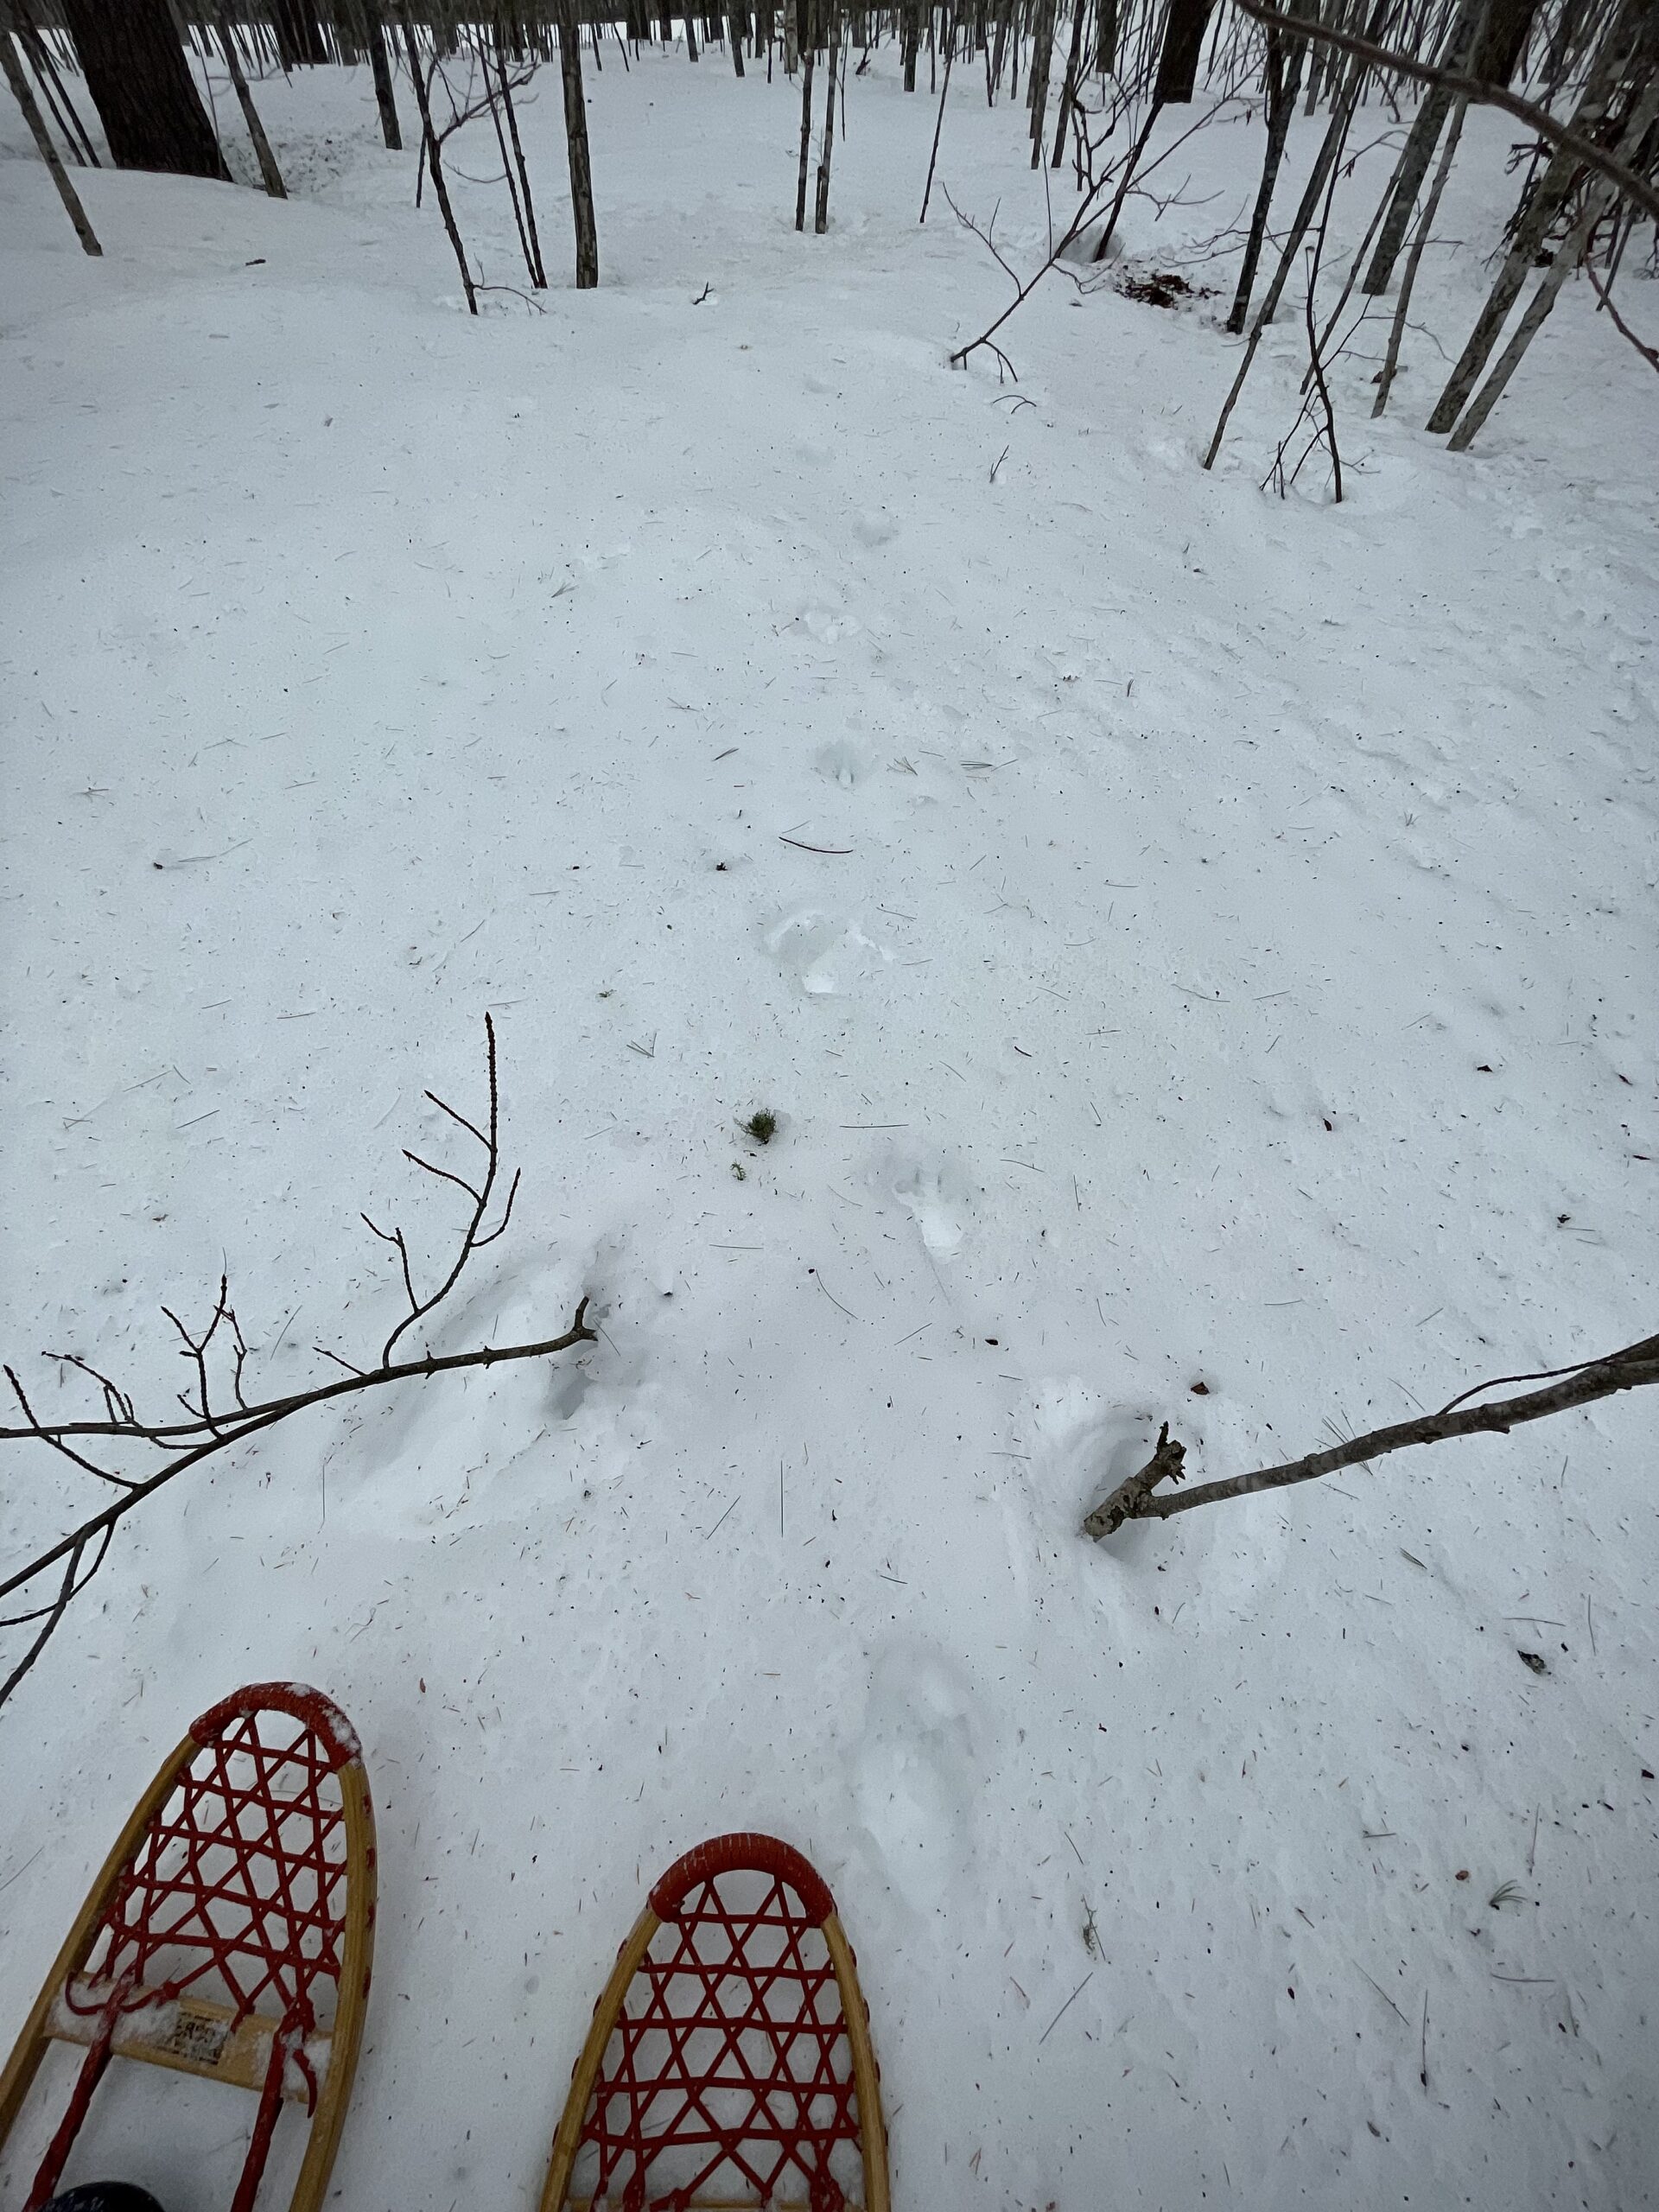
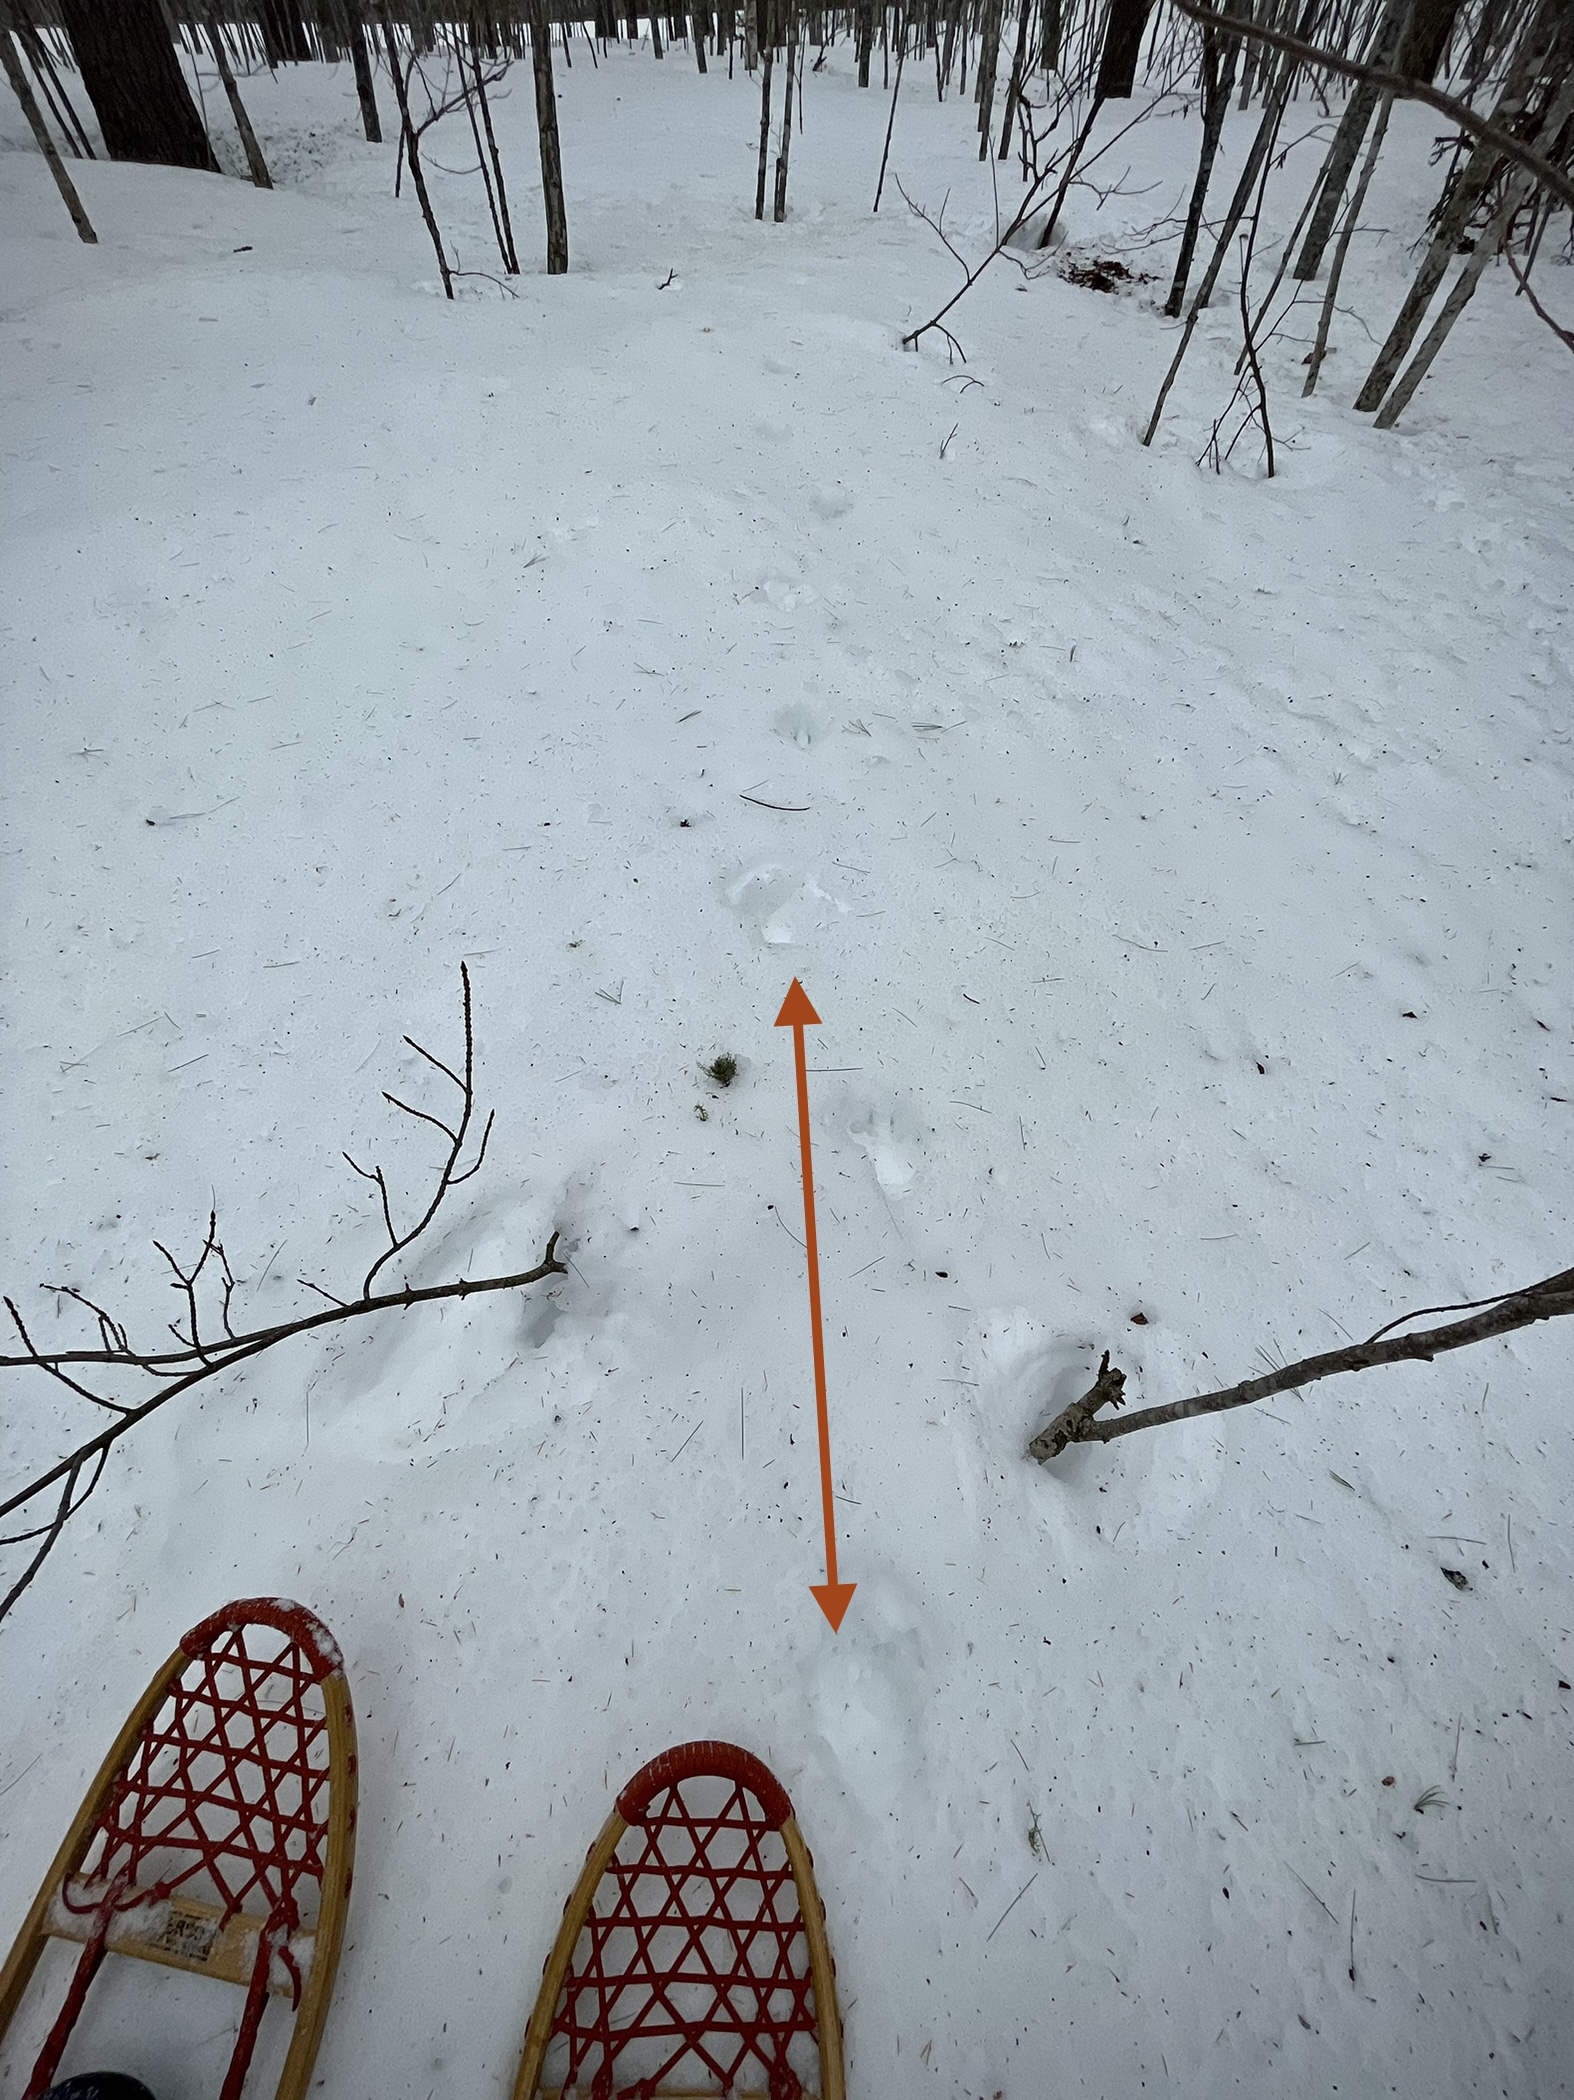
I also used my snowshoes in a similar manner for measuring the length between individual prints (the animal’s stride length), which ranged between 2 and 3 feet, even in the deep snow.
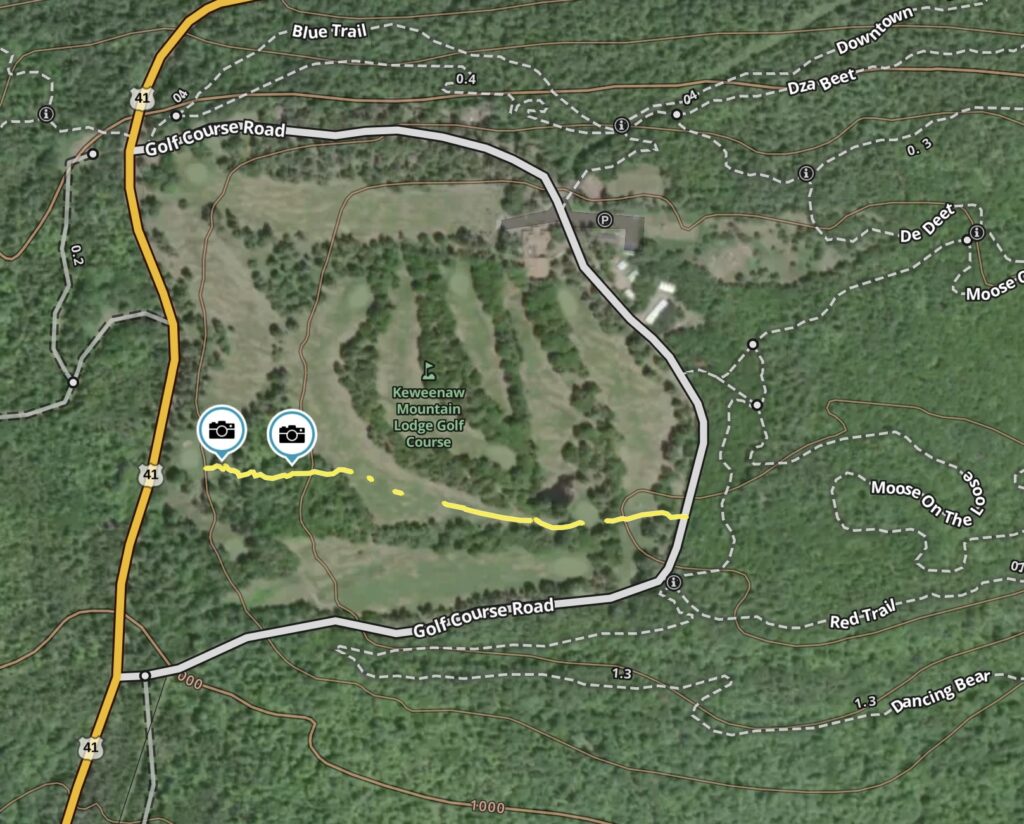
Series of tracks leading through an area of rough on the KML Golf Course
Series of tracks leading through an area of rough on the KML Golf Course, with a line added indicating a typical stride length for the animal.
With track sizes and stride length that large, I felt I could reasonably eliminate a coyote as the animal which created the tracks. In addition to that evidence, there were also some places where one of the animal’s leg sank deeply into the snow. At those places, I reached my arm down into the depression and noted where the surface of the snow correlated to my arm. In each case, the snow surface was at about mid-bicep on my arm. The tip of my fingers to mid-bicep measures 21 inches. This is telling, because in those instances of deep prints in the snow, the animal’s brisket did not leave a mark on the surface of the snow – further supporting that the animal was not a coyote.
Distinguishing dogs from wolves, especially just from tracks, can be challenging. Certainly, we allow dogs on KML property and we recently hosted Dawg Daze (a skijoring event) on our ski trails. However, tracks of domestic dogs are almost always on or adjacent to the cross country ski and snowshoe trails and don’t lead away from trails without a corresponding track caused by humans who are accompanying the dog. While I haven’t personally encountered nor heard of any free-ranging domestic dogs in the area, that doesn’t mean that there aren’t any. Another telling characteristic that this set of tracks was not created by a large domestic dog is in the pattern of movement. Most domestic dogs instinctively move in a back and forth (almost erratic) “scanning” fashion, on both small and large scales, whereas wolves tend to walk more directly when traveling.
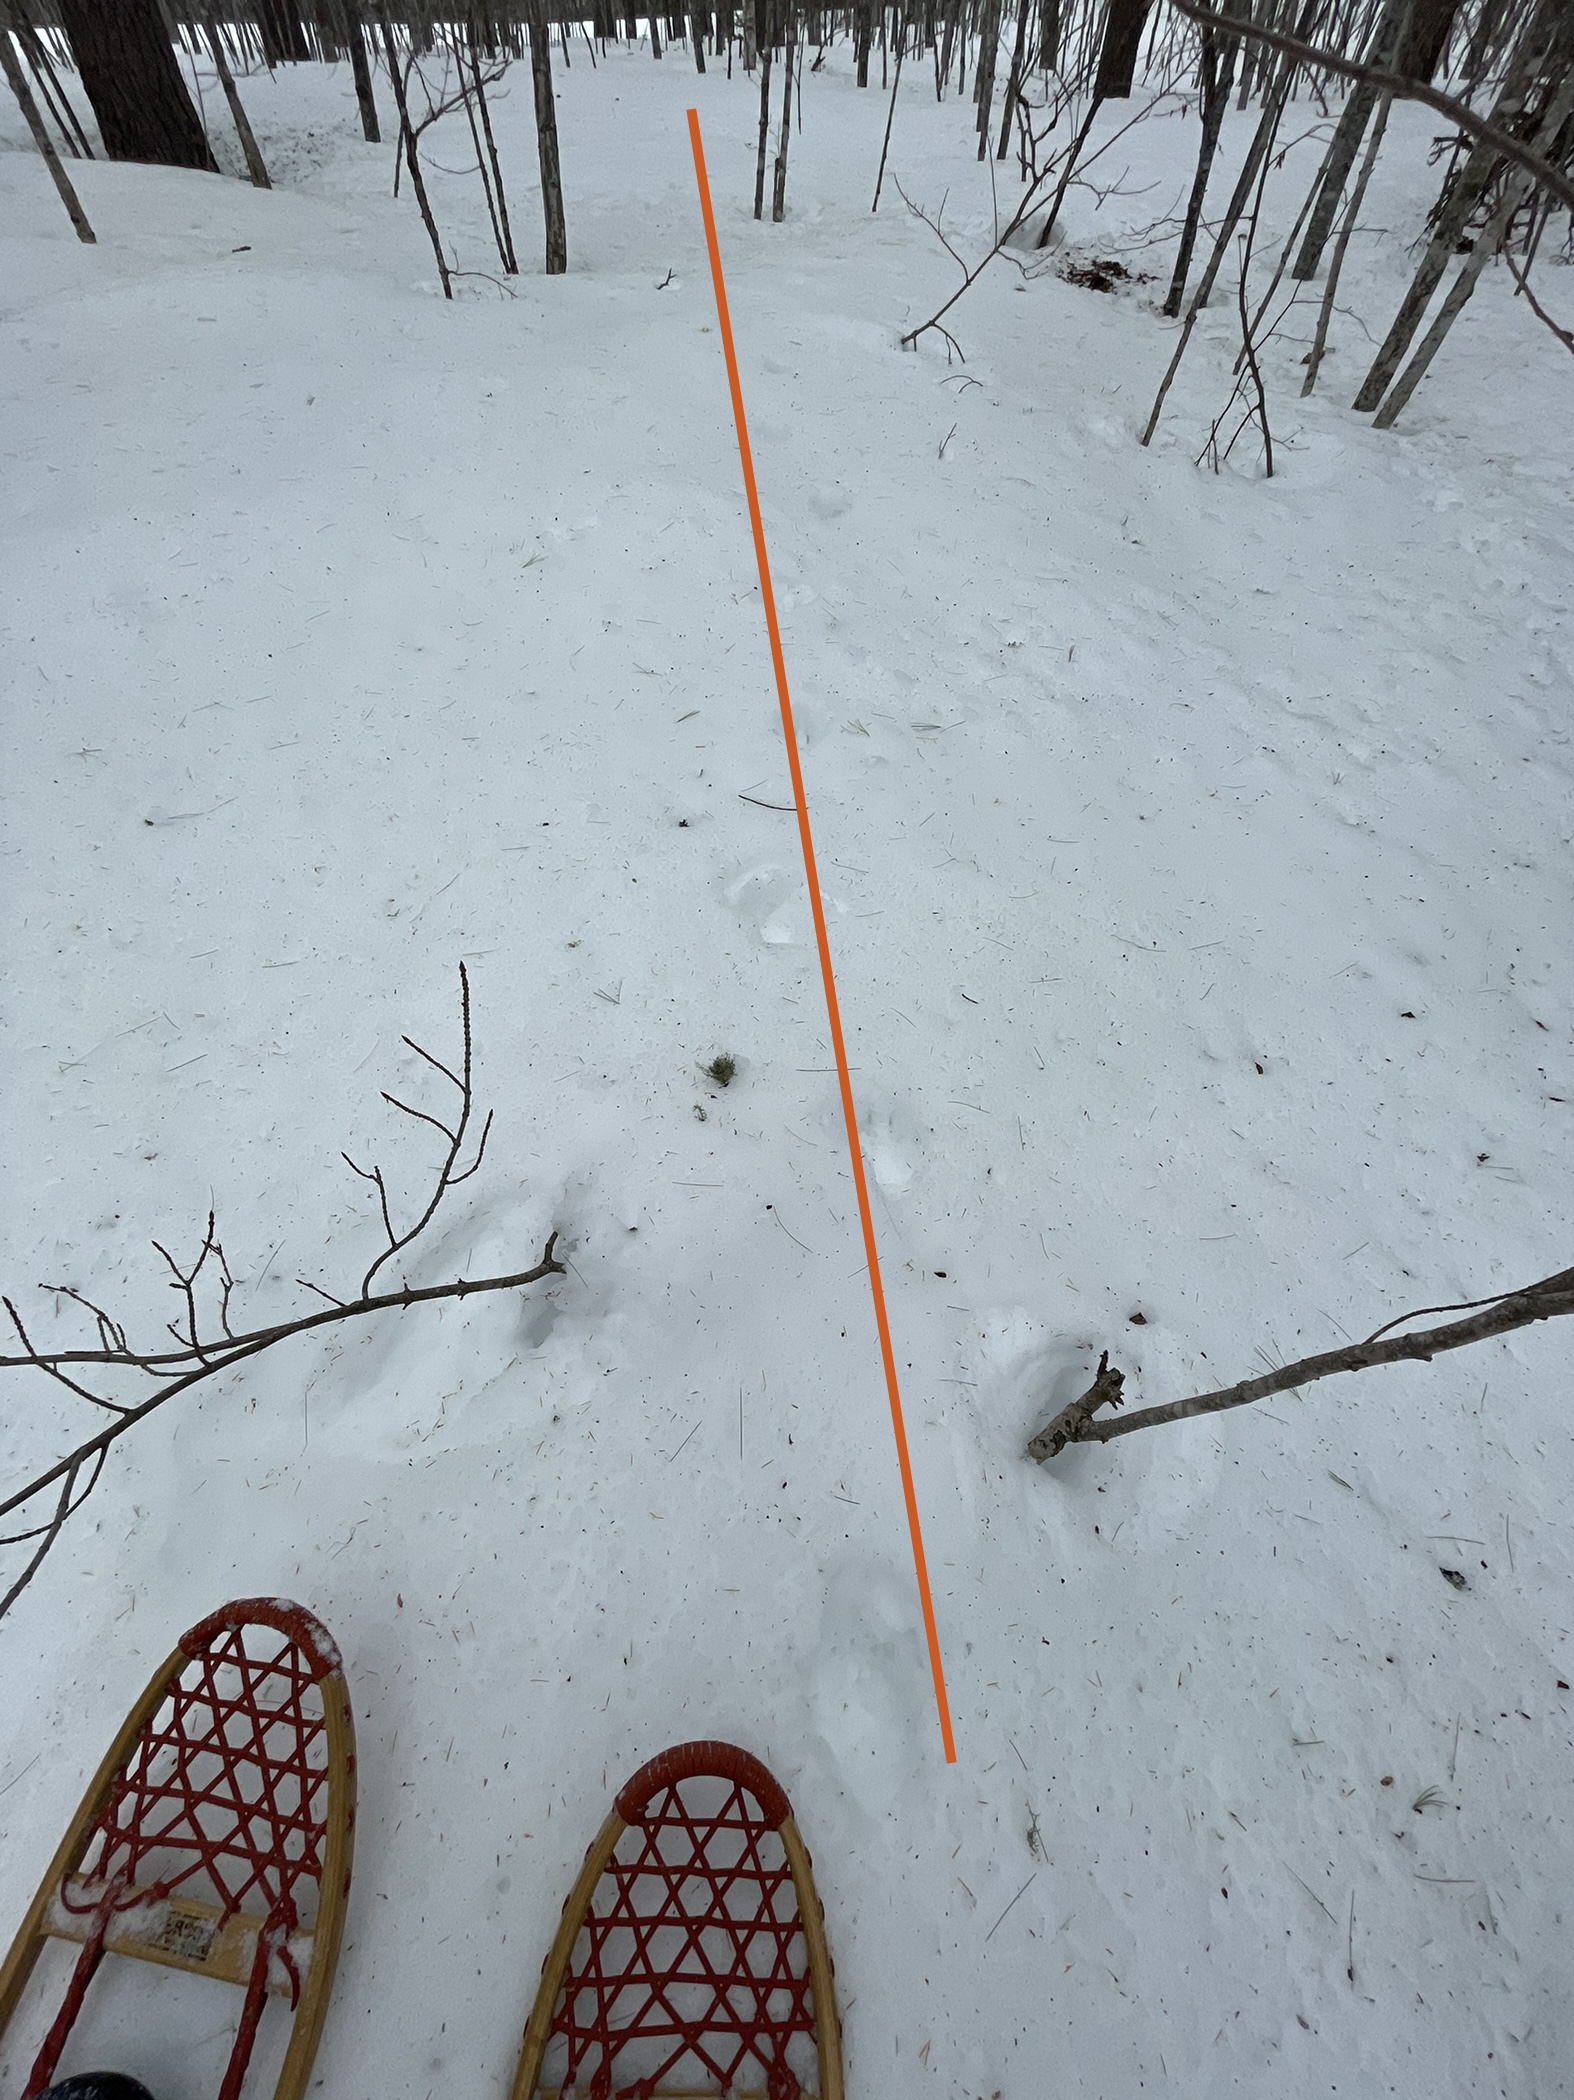
Wolf track with a line added showing non-erratic direction of travel.
When looking at the GPS trail of the animal’s path across the golf course it is very direct in its heading.
Please note the “gaps” in the GPS trail on the map are due to me losing the animal’s track for a brief period of time due to its ability to intermittently walk on top of the snow. When this would happen, I would shut the GPS app off, begin an arching zig-zag pattern of searching the area to find the next discernible print, and then restart the GPS app when that happened.
For people, wolves have, for a very long time, been controversial creatures on the landscape. In terms of adaptability, the gray wolf (Canis lupus), as a species, is arguably one of the most adaptable top-predators that we know of in North America. They, historically, occupied all ecosystems on the continent, except maybe extreme arctic and alpine regions. The one thing gray wolves do not adapt to well, though, is encroachment by humans. So, where you find higher densities of people you will likely not encounter a wolf. For me to find the evidence of being in the same space as a wolf (within just a few hours) reminded me that even though the region is becoming more and more encroached on by human development it still remains a wonderfully wild place.